This reference for version: latest
| Moon 1.x documentation is published here. |
Moon is a browser automation solution compatible with Selenium, Cypress, Playwright and Puppeteer using Kubernetes or Openshift to launch browsers.
1. Getting Started
1.1. Quick Start Guide
|
This section shows how to install Moon limited to 4 parallel browser sessions. Detailed information on installing a license key allowing to activate more parallel sessions is shown in Installing License section. |
1.1.1. Installing to Kubernetes
Prerequisites
-
Running Kubernetes cluster
-
kubectlclient installed and pointing to the cluster -
If you are running Kubernetes cluster on virtual machines, we usually recommend having bigger VMs instead of smaller ones. This allows to avoid available CPUs and memory fragmentation issues. For example having 24 CPU cores overall it is better to start 3 x 8 CPU core VMs instead of 12 x 2 CPU core.
-
If you are starting Moon in Kubernetes cluster deployed on workstation with minikube tool - see Option 3: you have Minikube.
Option 1: use Helm chart
|
We deliver already packed and published Helm charts, so installing Moon with Helm is straightforward:
-
Add Aerokube charts repository:
$ helm repo add aerokube https://charts.aerokube.com/ $ helm repo update -
To list available Moon versions type:
$ helm search repo aerokube --versions -
Create a namespace:
$ kubectl create namespace moon -
To install or upgrade Moon type:
$ helm upgrade --install -n moon moon aerokube/moon2 -
Moon chart has a lot of other configuration parameters that can be listed as follows:
$ helm show values aerokube/moon2To change one of these parameters - use
--setflag:$ helm upgrade --install --set=moon.enabled.resources=false -n moon moon aerokube/moon2 -
By default, deployed Ingress has
moon.aerokube.localhost name. To change it:$ helm upgrade --install -n moon moon aerokube/moon2 --set ingress.host=moon.example.comOpen http://moon.example.com/ in browser to show user interface. Use http://moon.example.com/wd/hub as Selenium URL.
-
By default, Moon is started in HTTP-only mode. To enable TLS encryption (also known as HTTPS) - simply provide TLS certificate and private key:
$ helm upgrade --install -n moon moon aerokube/moon2 --set ingress.host=moon.example.com --set-file ingress.tlsCert=server.crt --set-file ingress.tlsKey=server.keyUsually TLS certificate and private key are provided by third-party providers or your company information security department. To generate a test pair of such files use the following commands:
# Generate the CA Key and Certificate
$ openssl req -x509 -sha256 -newkey rsa:4096 -keyout ca.key -out ca.crt -days 356 -nodes -subj '/CN=My Cert Authority'
# Generate the Server Key, Certificate request and Sign with the CA Certificate
$ openssl req -new -newkey rsa:4096 -keyout server.key -out server.csr -nodes -subj '/CN=moon.aerokube.local'
$ openssl x509 -req -sha256 -days 365 -in server.csr -CA ca.crt -CAkey ca.key -set_serial 01 -out server.crt
When using such self-signed TLS certificates you may need to explicitly allow opening Moon in your browser.
Option 2: you have Minikube
|
Every browser by default requires 1 CPU and 2 GB of memory. We recommend having at least 4 CPUs and 8GB of memory in your Minikube cluster. When having less CPUs browser pods may not start because of insufficient computing resources. We do not recommend using Docker driver for Minikube. Minikube startup under Linux
Minikube startup under MacOS
Minikube startup under Windows
|
-
Enable Ingress addon in Minikube:
$ minikube addons enable ingress -
Install Moon with Helm as shown above.
-
Configure access to Moon:
-
Option 1. Use
minikube ipto patch Moon service.-
Patch service with
minikube ipcommand output:$ kubectl patch svc moon -n moon --patch "{\"spec\":{\"externalIPs\":[\"$(minikube ip)\"]}}"On Windows - you may need to insert
minikube ipoutput manually, because$()expression expansion may not work. -
Add
moon.aerokube.localto/etc/hosts:$ sudo echo "$(minikube ip) moon.aerokube.local" >> /etc/hostsOn Windows you may need to update hosts file manually.
-
-
Option 2. Use minikube tunnel. This works only when minikube is using Docker driver.
-
Add
moon.aerokube.localto/etc/hosts:$ sudo echo '127.0.0.1 moon.aerokube.local' >> /etc/hosts -
Start Minikube tunnel in a separate tab. Enter your password when prompted:
$ minikube tunnel
-
-
-
Open http://moon.aerokube.local/ in browser to show user interface. Use http://moon.aerokube.local/wd/hub as Selenium URL.
1.1.2. Installing to Openshift
-
Prerequisites:
-
Running Openshift 4.x cluster
-
occlient installed and pointing to the cluster. Installation was tested whenochas administrator permissions.
-
-
Create a project (the same as Kubernetes namespace) for Moon:
$ oc new-project moonIn the next steps we assume that Openshift project for Moon is called
moon. -
Add Aerokube charts repository:
$ helm repo add aerokube https://charts.aerokube.com/ $ helm repo update -
To install or upgrade Moon type:
$ helm upgrade --install --set ingress.openshift=true -n moon moon aerokube/moon2Here
-n moonpoints to the project created on the previous step. -
Edit user and group id in configuration object to match values allowed by Openshift policies (e.g. set to
1000650000, exact value depends on Openshift configuration):$ oc edit config.moon.aerokube.com default -n moon
|
To test everything locally you can use Openshift Local. In that case you need to additionally pass Ingress hostname as follows: Having running Moon pods - add |
1.2. Architecture
1.2.1. Moon Components
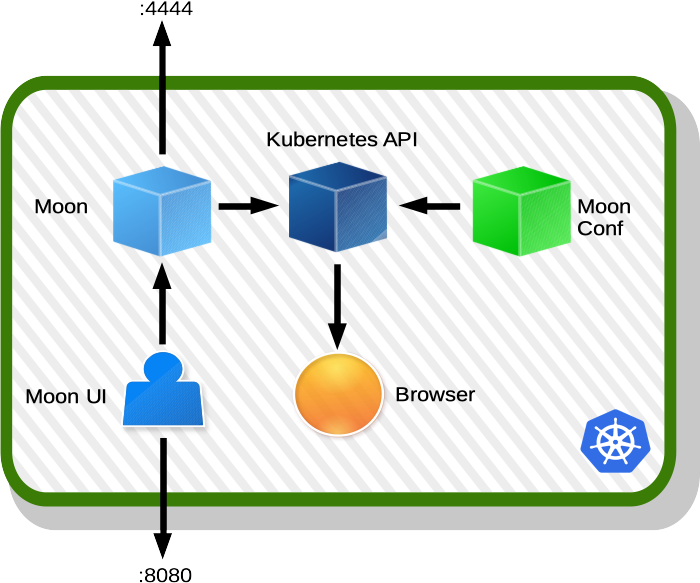
Moon cluster consists of several components:
-
One or more
Moonapplication instances. Their main purpose is to start and stop browser containers. These replicas are usually exposed as Kubernetes service available on standard Selenium port4444. You should run all the tests against this service. Also, this application provides an API to get information about running browser instances (in Moon 1.x this was a separate application calledMoon API). -
One or more
Moon Confapplication instances. This application is restarting Moon pods when you update a license key. -
One or more
Moon UIapplication instances.Moon UIcollects information from Moon and visualizes it. It is usually available on HTTP port8080. -
Running browser pods.
1.2.2. Moon Operation Modes
Moon 2.x has two different operation modes: single namespace mode and multiple namespaces mode.
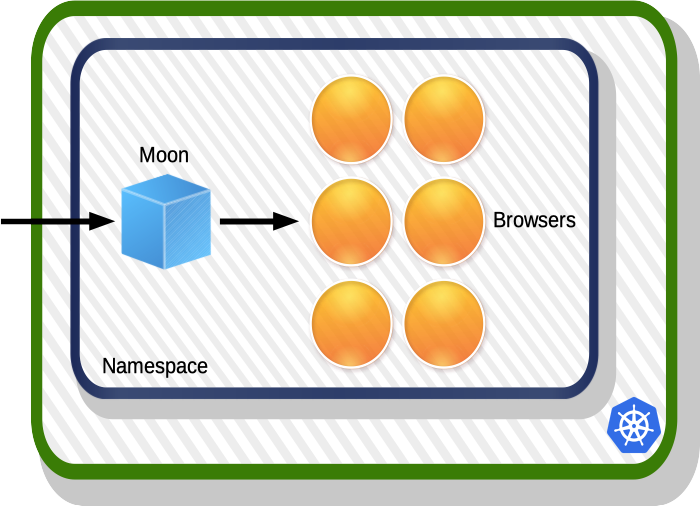
In single namespace mode Moon itself and all launched browser pods are running in the one Kubernetes namespace. Moon 1.x was only able to work like this. This is still suitable if only one team is using Moon or you don’t need to limit browser consumption of different Moon users. By default, Moon is launched in this mode.
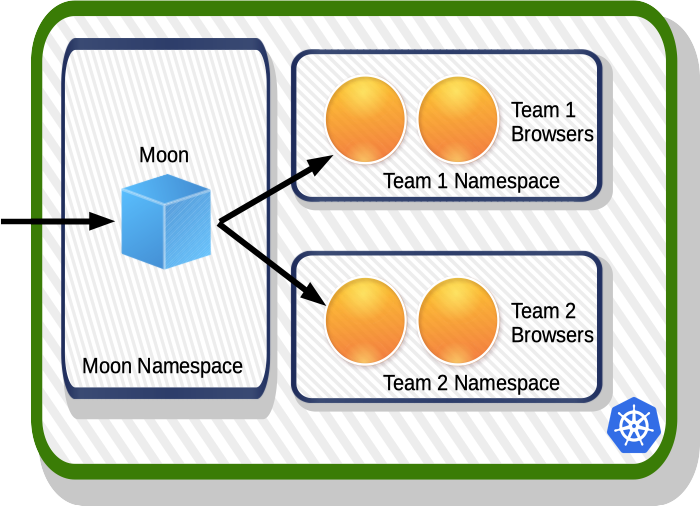
In multiple namespaces mode Moon is running in one namespace and browsers are launched in separate namespaces. The total number of such namespaces is unlimited. This mode is mainly needed when you want to control computing resources, browsers or network access rules (network policies) available for every team. How to enable this mode is described here.
1.2.3. Browser Pod Contents
In addition to container with browser every pod created by Moon contains one or more service images.
| Name | Purpose | Started |
|---|---|---|
ca-certs |
Needed to provide CA certificates to browser |
Always as init container |
defender |
Allows only one browser session to be created in the pod, handles session timeouts |
Always |
proxy |
Handles proxy authentication for Selenium |
When proxy |
video-recoder |
Records video of running browser screen |
When video recording is requested by user |
vnc-server |
Delivers VNC connectivity to browser images |
When browser window is visible |
x-server |
Delivers an X server for running non-headless browsers |
When browser window is visible |
1.3. Recommended Cluster Settings
-
Use the biggest possible cluster node sizes. For example having 100 CPUs overall it is better to launch 5 nodes with 20 CPUs each than 50 nodes with 2 CPUs each. Browser pods can in some cases require more than 2 CPUs and this can lead to preliminary cluster fragmentation.
-
Avoid cluster nodes with RedHat \ CentOS if possible. Nodes using these distributions are known to suffer from issues related to firewall \ SeLinux and can be more complicated to configure correctly.
-
Use Calico container network interface instead of Flannel if possible. Calico has better performance than Flannel especially on big clusters.
-
Use more than 1 Kubernetes API replica if needed. Moon is using Kubernetes API to create and delete browser pods. If you plan to run hundreds of browsers in parallel - take a look at Kubernetes API (Kubernetes master) host system metrics. Overloaded master can stop responding to requests properly and this can lead to frozen browser pods.
1.4. Required Permissions
Moon requires a limited set of permissions and should work with default Kubernetes settings. By default, Moon runs browsers in the same moon namespace where it runs (single namespace mode). Moon 2.0.0 and above supports multiple Kubernetes namespaces. This allows you to have one Moon instance running in moon namespace and an arbitrary number of namespaces for running browsers of different users (multiple namespaces mode). This allows you to easily set maximum number of browsers allowed to run by every team.
1.4.1. Single Namespace Mode
The following table summarizes what needs to be accessible for Moon in single namespace mode:
Permission |
Purpose |
To get, watch, list, create, delete, update and patch pods |
Used to manipulate pods with browsers |
To get, watch, list, create, delete, update and patch config maps |
Used to pass users and groups to browser pods |
To get, watch, list, create, delete, update and patch deployments and replica sets |
Used in license functionality |
To get, watch and list Moon custom resources in |
These custom resources store Moon configuration. Moon licenses ( |
1.4.2. Multiple Namespaces Mode
When running browsers in multiple namespaces required permissions differ. The following table shows Moon permissions in the namespace where it is running:
Permission |
Purpose |
To get, watch and list information about namespaces |
Needed to control how many browsers are running in every user namespace |
To get, watch and list pods |
Used to analyze pods in Moon namespace |
To get, watch, list, create, delete, update and patch deployments and replica sets |
Used in license functionality |
To get, watch and list Moon custom resources in |
These custom resources store Moon configuration. Moon licenses ( |
For every user namespace Moon needs the following permissions:
Permission |
Purpose |
To get, watch, list, create, delete, update and patch pods |
Used to manipulate pods with browsers |
To get, watch, list, create, delete, update and patch config maps |
Used to pass users and groups to browser pods |
1.5. Difference between Moon 2.x and Moon 1.x
Moon 2.x is the new major Moon version adding a lot of improvements. This section summarizes the most notable changes.
-
Multiple Kubernetes namespaces. Moon 1.x allows to run all browsers in one Kubernetes namespace. However, the same Moon cluster is often being used by different teams. A common problem is limiting the maximum number of browsers available for every team. Limiting the number of browsers is the same as limiting the number of CPUs and memory available for every team. Kubernetes solves this problem by introducing namespaces. Namespaces can be considered as projects that can have some limited number of computing resources assigned by Kubernetes administrator. In Moon 2.x you can create an unlimited number of separate namespaces for browsers, one for every team, and then configure Moon to launch browsers in these namespaces. This gives Kubernetes administrator full control of resources consumption for every team. From the license key perspective - you are still using one license key for all these namespaces. In Moon 1.x in order to use separate namespaces for different teams you had to install a separate Moon instance to every namespace and use a different license key for every such instance. This sometimes prevented teams from requesting more browsers during the peak load. In Moon 2.x one big license key is automatically shared between namespaces and thus if licenses are available, every team during the peak load can request more browsers than it usually needs. Detailed description of how it looks like is provided in Architecture section.
-
Improved configuration. Moon 1.x is using JSON configuration files. For example Moon 1.x browsers list file is stored in Kubernetes config map and looks like this:
Typical Moon 1.x Browsers List File{ "firefox": { "default": "95.0", "versions": { "95.0": { "image": "browsers/firefox:95.0", "port": "4444", "path": "/wd/hub" } } } }Moon 2.x instead if providing custom resources for configuration. For example browsers list file is now called a browser set and is a native Kubernetes citizen:
Moon 2.x Browser SetapiVersion: moon.aerokube.com/v1 kind: BrowserSet metadata: name: default namespace: moon spec: selenium: firefox: repository: quay.io/browser/firefox chrome: repository: quay.io/browser/chromeYou can easily inspect and update such objects with any compatible Kubernetes client, e.g.:
$ kubectl get browsersets -n moon -o yaml # Show all available browser sets
$ kubectl edit browserset default -n moon
The same applies to other configuration files and even to Moon license key manipulation:
$ kubectl get license -n moon
NAME      LICENSEE          SESSIONS   EXPIRES
default   Acme Inc.         10         2022-10-11T18:38:42Z
Every modification in such configuration objects is automatically validated by Kubernetes before saving, so it’s less error-prone.
-
New browser versions are available automatically. Moon 1.x requires to add an image for every new browser version to browsers list file manually. If a browser version is missing, then Moon 1.x will not be able to start this browser. Moon 2.x contrarily only needs to configure a browser image repository for every browser type. Once configured - new browser versions are detected automatically.
-
Improved browser performance. Moon 2.x is using completely new browser startup architecture that starts only required operating system components for current set of requested browser features. For example, operating system components responsible for window management are started only when browser window is visible (browser is not "headless"). This leads to smaller browser images, faster startup and faster browser commands execution.
-
Lower cloud resources consumption. Reworked browser startup architecture leads to at least 20% lower average cloud resources (CPU, memory, network traffic) consumption.
-
Improved network communication. Moon 1.x relies on Kubernetes DNS implementation (e.g. CoreDNS) for communicating with browser pods. DNS service is known to suffer from caching and cloud-specific networking issues which can in rare cases lead to broken browser sessions. Moon 2.x relies on pod IP addresses instead and does not depend on DNS at all.
-
No built-in authentication. Moon 1.x supports only basic HTTP authentication. Moon 2.x instead does not provide built-in authentication mechanism by default. Instead, you can use existing Kubernetes-compatible software (e.g. Nginx Ingress Controller) to provide any authentication mechanism (e.g. mutual TLS authentication) you need. Moon derives username from
AuthorizationorX-Moon-QuotaHTTP headers. See Users section for more details. -
OpenID Connect support. Moon 2.x comes with a ready-to-use sidecar container for using OpenID Connect authentication. This allows for example to easily use an existing private or public OAuth service. For example, you can easily load existing Github users like this.
-
Improved self-signed TLS root certification authorities support. Companies are often using self-signed TLS certificates for internal web services. In Moon 2.x adding support for such self-signed TLS certificates is as easy as providing TLS self-signed root certification authority in Moon configuration. You can configure it globally for all Moon components and browser versions in a single place.
Moon 2 self-signed root CA configurationapiVersion: moon.aerokube.com/v1 kind: Config metadata: annotations: name: default namespace: moon spec: additionalTrustedCAs: | -----BEGIN CERTIFICATE----- ... -
Advanced Selenium features. Moon is fully compatible with W3C Webdriver protocol meaning that all Selenium 4.x features will work out of the box. In addition to these standard features Moon provides some advanced browser manipulation methods like interacting with the clipboard or getting files from browser container. For example, you can easily copy and paste arbitrary text data and images from your tests to browser clipboard.
1.6. Moon vs other solutions
Moon takes all the best practices and features from existing browser automation solutions and adds many more:
-
Browser automation Swiss army knife. Moon supports all the most popular browser automation tools (Selenium, Playwright, Cypress, Puppeteer) out of the box. We automatically build and publish images for all new browser releases.
-
Unlimited automatic scalability. You always have enough browsers of any desired version available in the cluster. When running the cluster in cloud platforms such as Amazon Web Services or Google Cloud you can adjust settings to automatically scale depending on current load. This allows to combine efficiency with competitive cost.
-
Completely stateless. Selenoid and Selenium Grid 3.x store in memory information about currently running browser sessions. Selenium Grid 4.x is using a key-value storage (e.g. Redis) for the same purpose. If for some reason process that stores sessions list crashes then all running sessions are lost. Moon contrarily has no internal state and can be replicated across datacenters. Browser sessions remain alive even if one or more replicas go down.
-
Fine-grained resources control. Moon allows to easily configure computing resources available for every used component. This leads to predictable computing resources consumption and overall cluster cost.
-
Fully graceful. Any maintenance operations with the cluster do not interrupt running browser sessions. Every cluster component shuts down gracefully.
2. Main Features
2.1. User Interface
|
2.1.1. Overview
Moon comes with a powerful user interface allowing to list and filter running browser sessions, view browser screen, launch browser sessions for manual testing and so on.
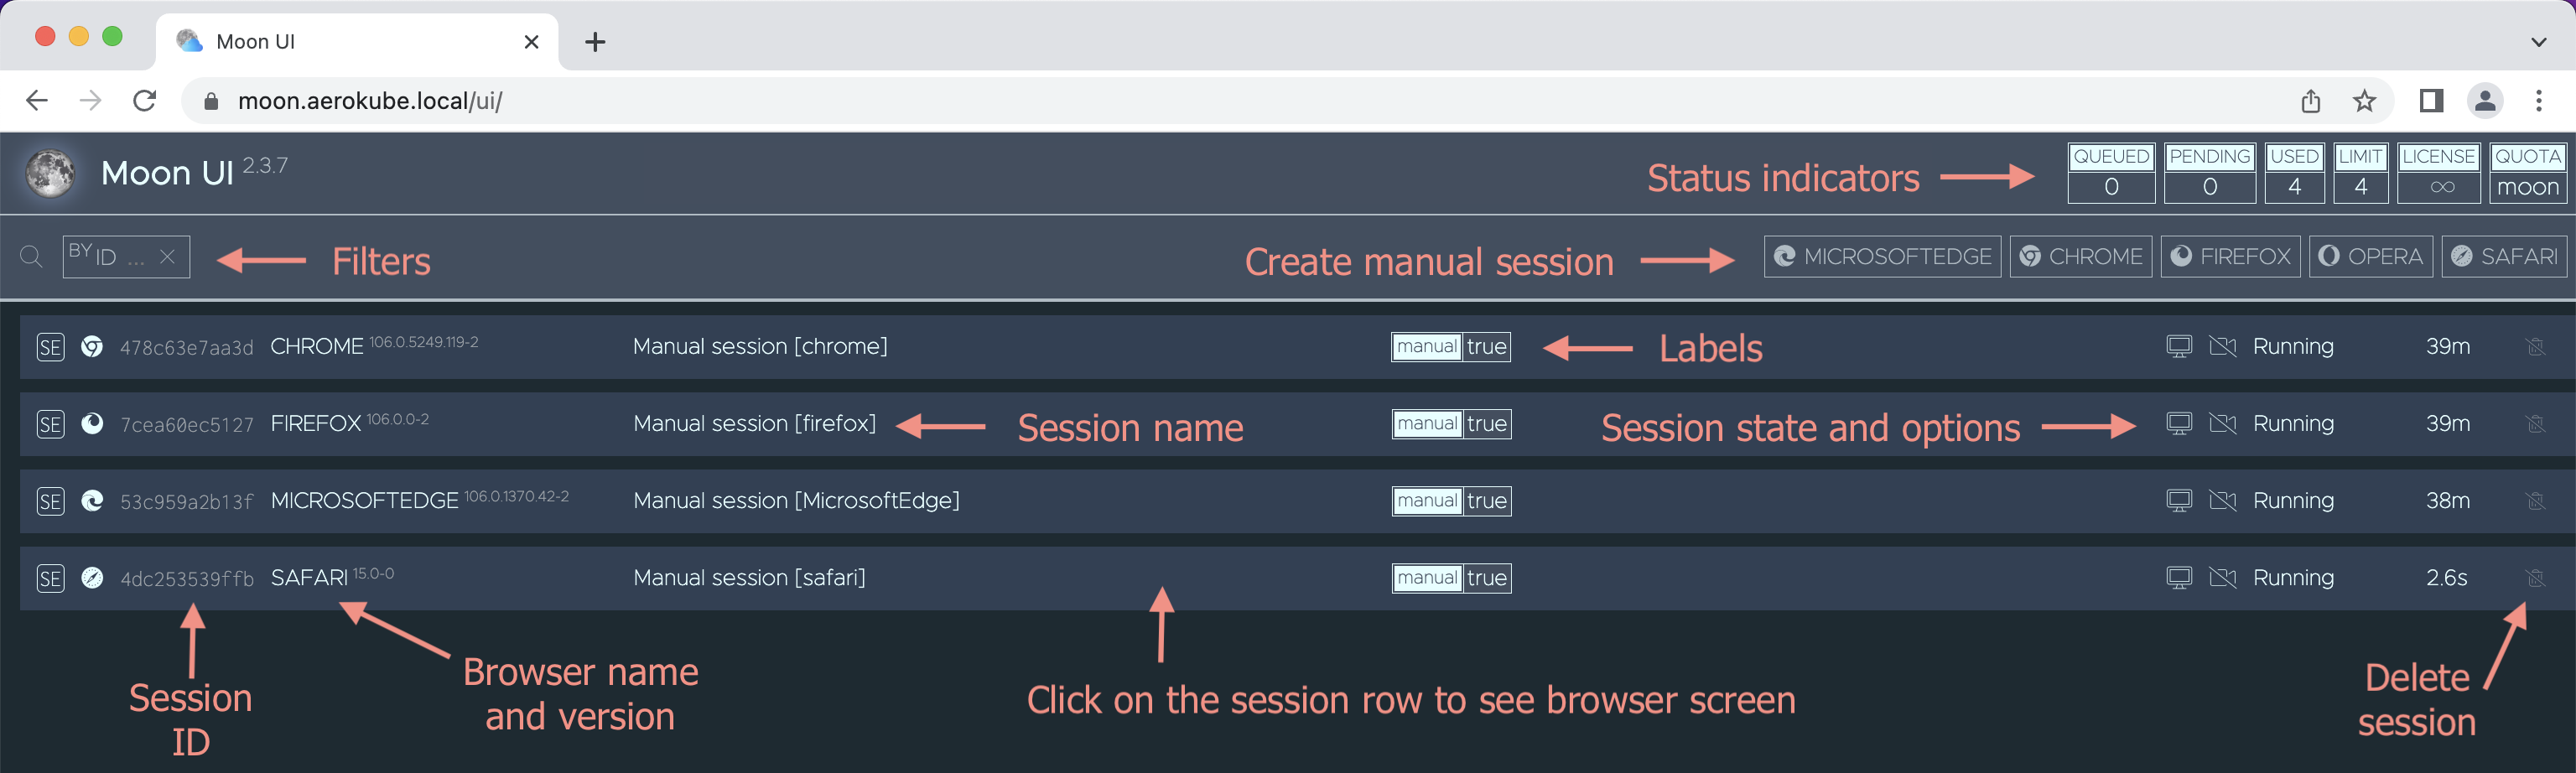
The main screen of the UI is showing the list of browser sessions that are currently running or being started. For every session you can see browser automation tool, browser name, version, test name, labels, status, duration, enabled features and so on. To delete a running session you have to click twice on the button with a trash can icon (two clicks are needed to prevent accidentally removing a running session). To create a browser session for manual testing - click on the button with browser name at the top of UI screen.
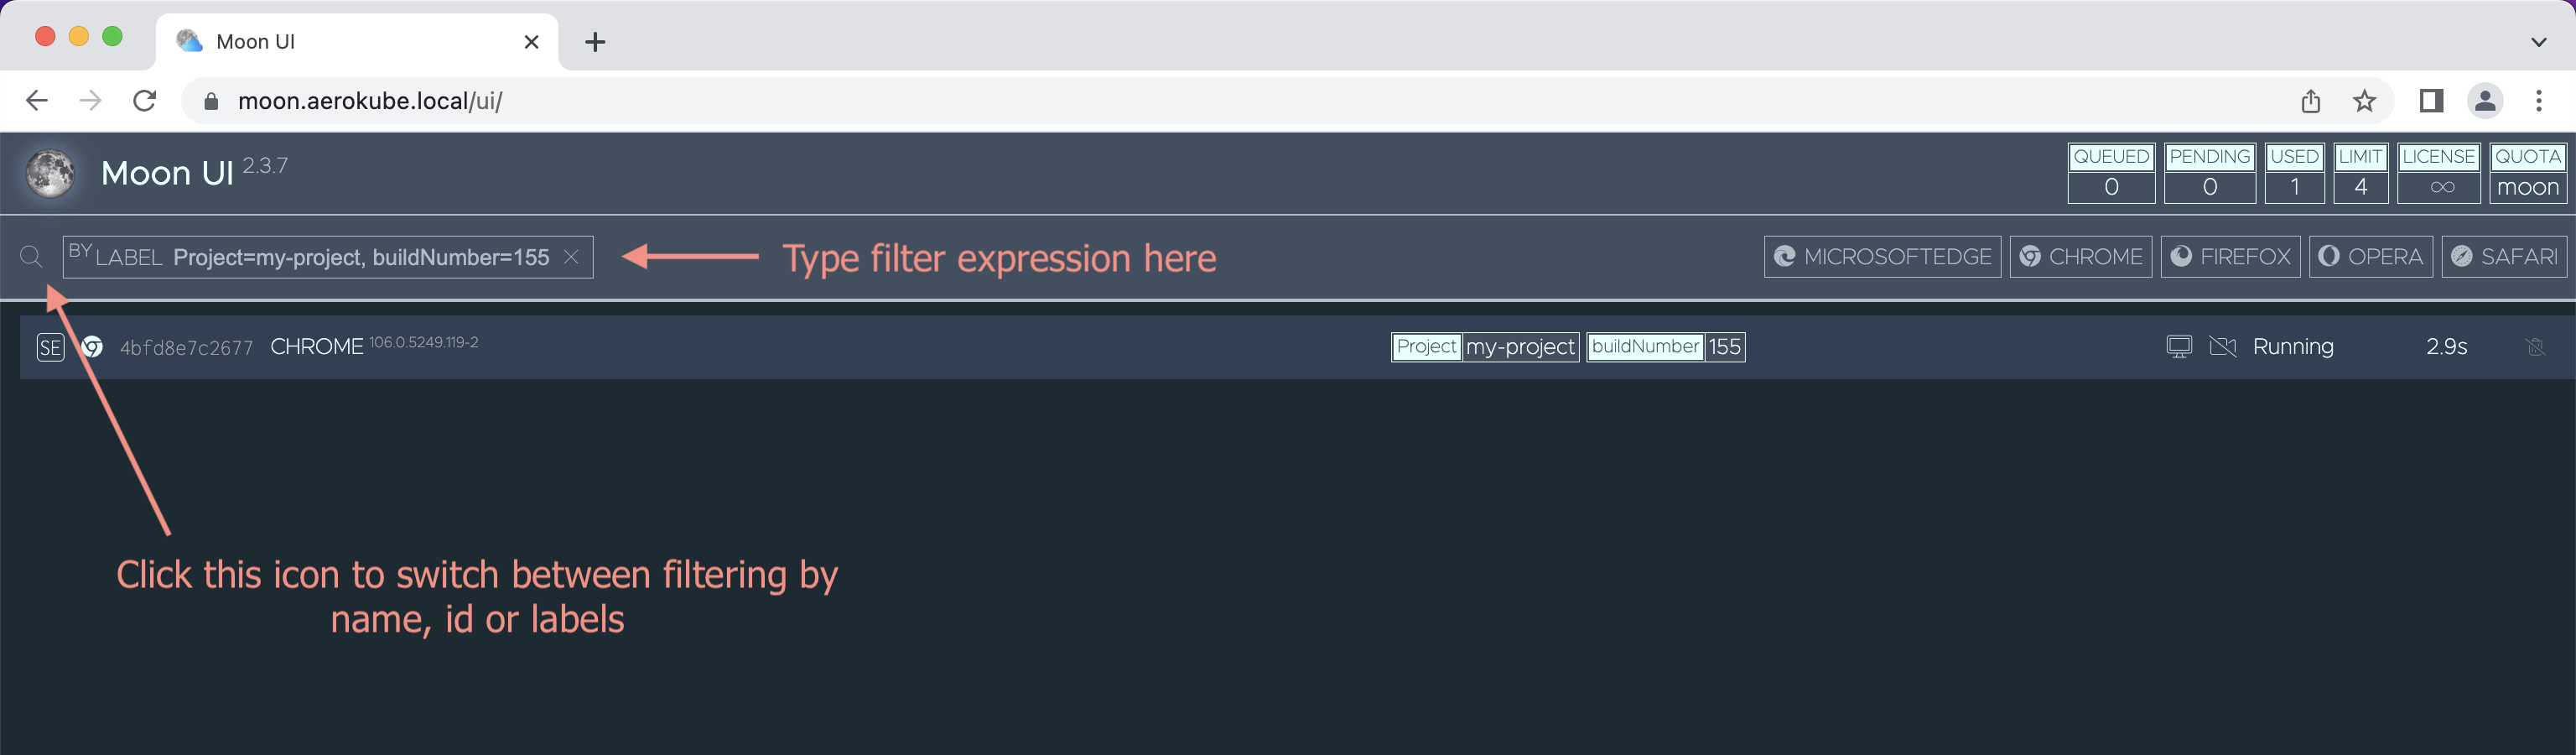
One Moon cluster can run dozens, hundreds or even thousands of browser sessions in parallel. To find sessions that belong to your project or exact build number - use filters. These controls allow to filter browser sessions by id, name and labels:
-
Session id is a unique value automatically assigned to every browser session by Moon. You can’t change it. Full session id looks like this:
chrome-73-0-ac15ffaa-e641-4c7f-a54c-f25b5be1f135. In the UI we are printing only a few symbols of this long value. -
Session name is a free-form value allowing to describe purpose of the session in the UI. Usually this value contains test case name. To change session name - use name capability for Selenium or name parameter for Playwright, Cypress or developer tools, e.g.:
wss://moon.example.com/playwright/chromium?name=MyTestCaseName -
Session labels are free-form key-value pairs allowing to put additional metadata on every browser session. This can be for example build number, project name, release information and so on. To add labels - use labels capability for Selenium or configure labels in browsers set. Every label requested to be set by Moon is converted to a Kubernetes label added to respective browser pod. User interface is using exactly the same syntax of label selectors that is supported by Kubernetes. For example, having
projectandbuildNumberlabels set to some browser session you can use expressions like this:How to filter by labelsproject=MyCoolProject # Exact match of one label project=MyCoolProject,buildNumber=42 # Match of project AND buildNumber values project in (MyCoolProject, AnotherProject),buildNumber!=42 # Select project from the list project notin (MyCoolProject, AnotherProject),!buildNumber # Select project not from the list, build number not set project!=AnotherProject,buildNumber # Any project except AnotherProject, build number should be set
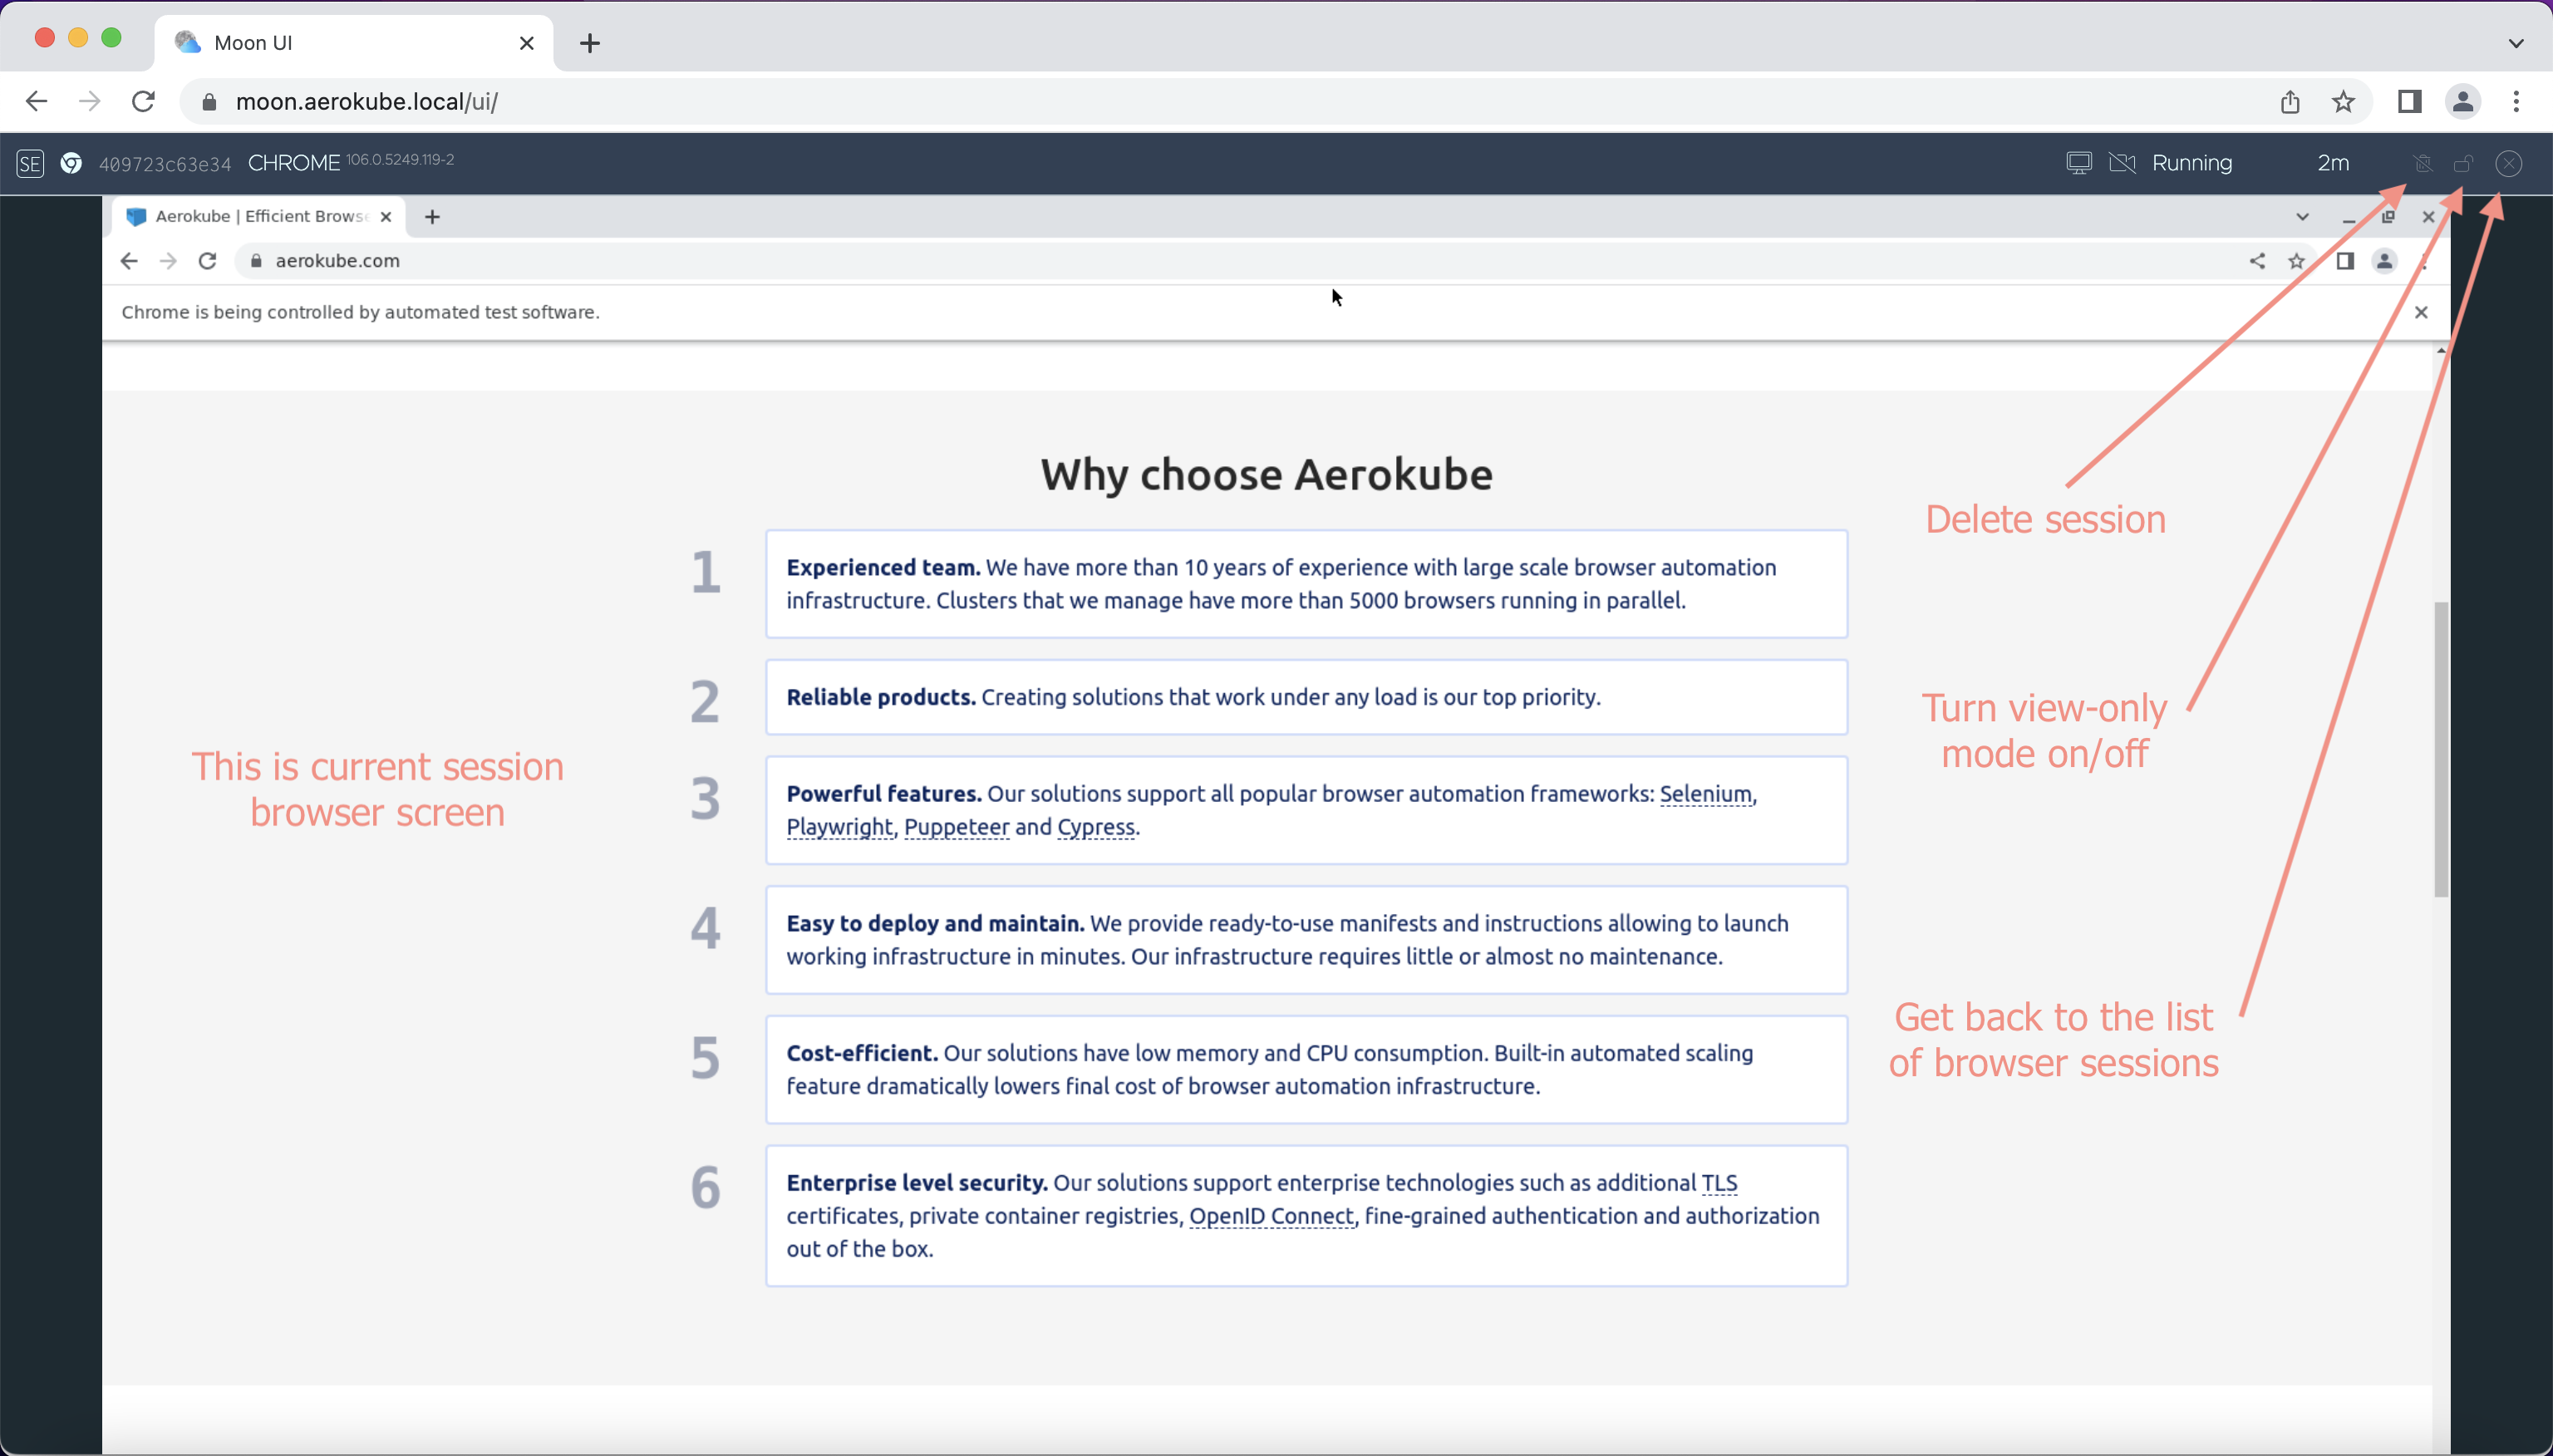
When you click on a row in the sessions list, browser screen is shown automatically if possible. For example for browser sessions with invisible browser window (so-called headless browsers) - nothing happens when you click on a row. By default, browser screen is in view-only mode. To interact with the browser - click on the button with the lock icon (🔒). Click on this button again - to switch back to view-only mode. Browser screen allows to follow automated test execution and intercept it when needed. When you launch a manual testing session - use this screen to manually execute your scenario step-by-step. All browser features like opening developer toolbar are working exactly the same as on your personal computer. To copy and paste values from your computer to Moon browser session - use Ctrl+C\Ctrl+V or Cmd+C\Cmd+V shortcuts on your keyboard.
2.1.2. Console
|
This feature is available since Moon 2.6.1. |
Console is a command-line interface available on Moon UI screen and giving more power to manual testing. The following features are available:
-
Listing available browsers and mobile emulation devices
-
Starting, listing and deleting browser sessions with desktop browsers and with mobile emulation enabled
-
Easily providing arbitrary additional browser capabilities
-
Opening VNC sessions for manual testing
This is how console looks like:
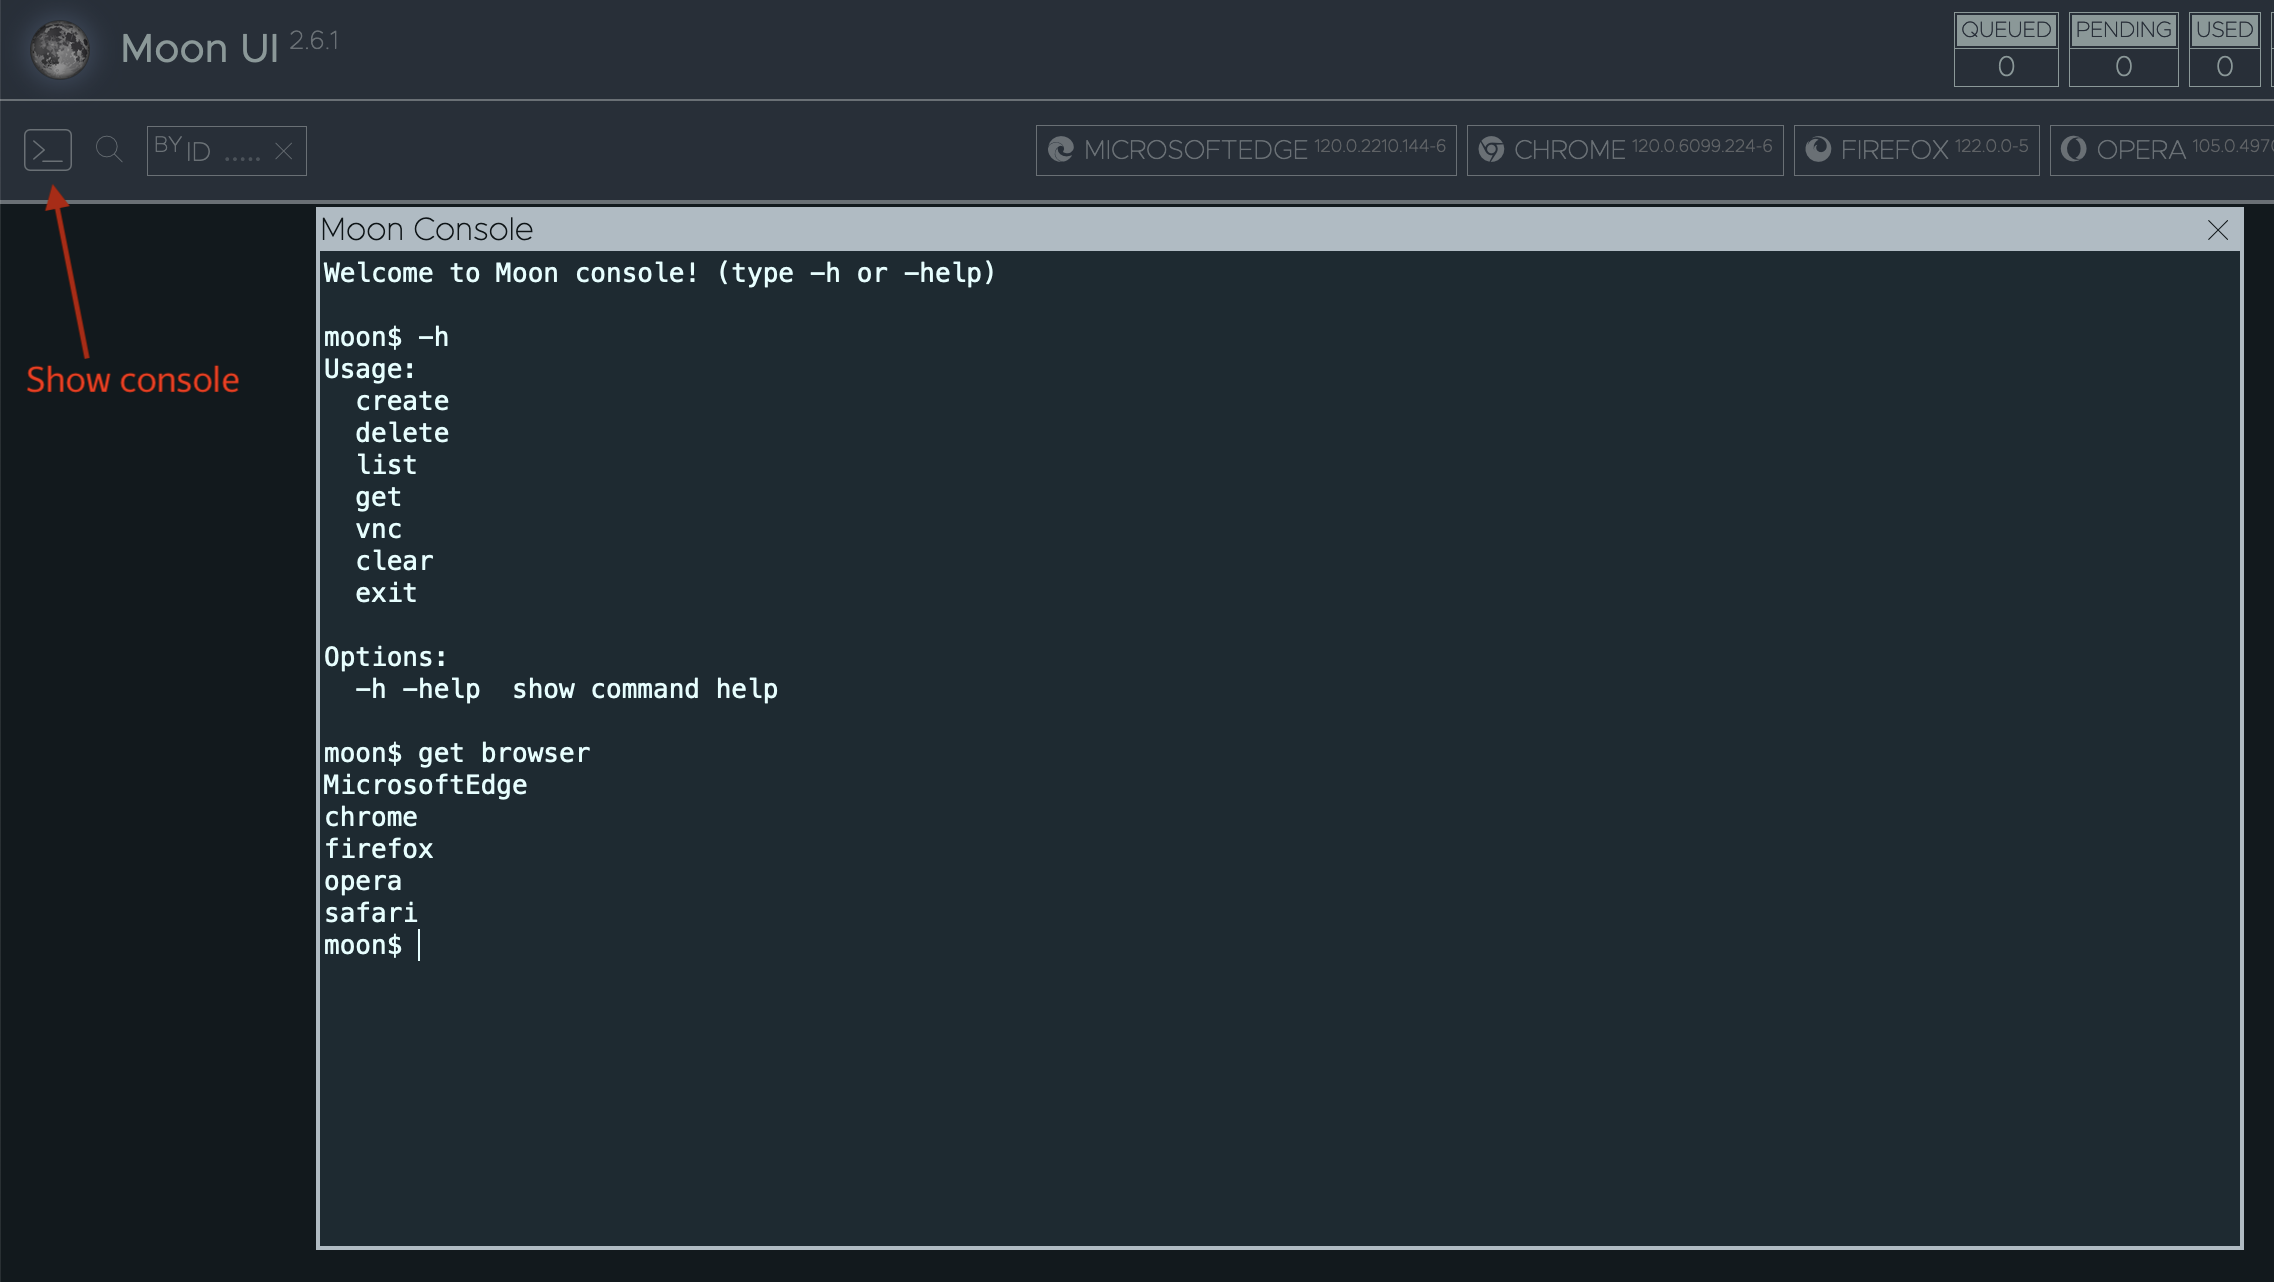
To open console:
-
Option 1. Click on the button shown on the picture above.
-
Option 2. Type
~(tilde) symbol on the keyboard.
Moon console works similarly to standard Unix terminal. To list all available commands type:
moon$ -h
Usage:
  create
  delete
  list
  get
  vnc
  clear
  exit
To show command syntax add -h or -help to command:
moon$ delete -h
Desc:
  delete - stop session

Usage:
  delete <session-id>
To view previous commands use arrow up and arrow down buttons. To clear previous commands output type:
moon$ clearTo exit from console just close console window with mouse or type:
moon$ exitTo list available browsers:
moon$ get browser
opera
safari
MicrosoftEdge
chrome
firefox
To list last 5 versions of chrome browser:
moon$ get browser -n chrome -l 5
120.0.6099.224-6 (default)
# If there are more browser versions in browser set, they will be shown here
To list mobile emulation devices:
moon$ get device -e "iPhone X" # Partial name match
"Apple iPhone X"
"Apple iPhone XR"
"Apple iPhone Xs"
"Apple iPhone Xs Max"
moon$ get device -e "iPhone X$" # Match device name by regex
"Apple iPhone X"
To launch a Chrome browser:
moon$ create browser -n chrome # Default Chrome version
chrome-120-0-124bcfdf-6f03-424c-80b4-6c2ee5b2f36f # This is launched session ID
moon$ create browser -n chrome -v 120.0 # Exact Chrome version
moon$ create browser -n chrome -caps '{"goog:chromeOptions": {"args": ["start-maximized"]}}' # Additional Selenium capabilities in JSON format
To launch mobile emulation:
moon$ create device -n "Apple iPhone Xs" -url https://aerokube.com/
chrome-120-0-6099-224-6-46e1198c-f73d-401d-be6c-6e127ef53f24
To view browser screen using VNC:
moon$ vnc chrome-120-0-6099-224-6-46e1198c-f73d-401d-be6c-6e127ef53f24To list available browser sessions:
moon$ list
chrome-120-0-124bcfdf-6f03-424c-80b4-6c2ee5b2f36f
To delete a running browser session:
moon$ delete chrome-120-0-124bcfdf-6f03-424c-80b4-6c2ee5b2f36f2.2. Using Selenium
|
We maintain a set of minimalistic projects demonstrating how to use Moon with your Selenium tool: |
Running Selenium tests in Moon is straightforward. Just use the following as Selenium URL in your tests:
https://moon.example.com/wd/hubMoon is fully compatible with W3C WebDriver specification, so all standard Selenium capabilities and features should just work out of the box. To request a browser - you have to provide browserName capability in your code, for example:
from selenium import webdriver

capabilities = {
    "browserName": "chrome"
}

driver = webdriver.Remote(
    command_executor='https://moon.example.com/wd/hub',
    desired_capabilities=capabilities
)
Concrete browser version that will be used depends on Moon configuration, but by default this is the latest available version. To request an exact browser version - provide browserVersion capability:
capabilities = {
    "browserName": "chrome",
    "browserVersion": "96.0"
}
Moon provides additional features by using extension commands and capabilities described in the next sections.
2.2.1. Moon-specific Capabilities
Moon supports a set of extension capabilities. You can pass them in your code to enable or disable some features. All these capabilities should be passed under moon:options key:
capabilities = {
    "browserName": "chrome",
    "moon:options": { # All Moon capabilities live under moon:options
        "enableVideo": True,
        "screenResolution": "1280x1024"
    }
}
In statically-typed languages like Java or C# you should use a Map (Dictionary) to pass Moon capabilities, e.g.:
capabilities.setCapability("moon:options", Map.of(
    "screenResolution", "1280x1024"
));
Custom Screen Resolution: screenResolution
Moon allows you to set custom screen resolution in containers being run:
screenResolution: "1280x1024"
You can optionally add colors depth:
screenResolution: "1280x1024x24"
|
This capability sets only screen resolution - not browser window size. Most of the browsers have some default window size value this is why your screenshot size can be smaller than screen resolution specified in capability. You should manually resize window to desired width and height or use Selenium |
Custom Test Name: name
For debugging purposes it is often useful to give a distinct name to every test case. You can set test case name by passing the following capability:
name: "myCoolTestName"
The main application of this capability - is debugging tests in the UI which is showing specified name for every running session.
Video Recording: enableVideo, videoName, videoScreenSize, videoFrameRate, videoCodec, pattern
| Using video recording requires initial configuration. |
To enable video recording for browser session, add:
enableVideo: true
-
By default, saved video files are named
video.mp4. To provide custom video name specify:Type: stringvideoName: "my-cool-video.mp4"
It is important to add mp4file extension. -
By default, the entire screen picture is being recorded. Specifying
screenResolutioncapability changes recorded video size (width and height) accordingly. You can override video screen size by passing a capability. In case ofvideoScreenSizeresolution is less than actual, screen on video will be trimmed starting from top-left corner:Type: stringvideoScreenSize: "1024x768"
-
Default video frame rate is
12frames per second. SpecifyingvideoFrameRatecapability changes this value:Type: intvideoFrameRate: 24
-
By default, Moon is using
libx264codec for video output. If this codec is consuming too much CPU, you can change it usingvideoCodeccapability:Type: stringvideoCodec: "mpeg4"
-
To organize custom S3 layout for every uploaded video - use
pattern(ors3KeyPattern) capability:Type: stringpattern: "$quota/$browserName/$sessionId"
Per-session Environment Variables: env
Sometimes you may want to set some environment variables for every test case (for example to test with different default locales). To achieve this pass one more capability:
env: ["LANG=ru_RU.UTF-8", "LANGUAGE=ru:en", "LC_ALL=ru_RU.UTF-8"]
Environment variables from this capability are appended to variables from Moon configuration. In statically-typed languages like Java or C# you should use a List to pass this capability, e.g.:
capabilities.setCapability("moon:options", Map.of(
    "env", Arrays.asList("LANG=ru_RU.UTF-8", "LANGUAGE=ru:en", "LC_ALL=ru_RU.UTF-8")
));
Hosts Aliases: hosts
Although you can configure a separate list of host aliases in /etc/hosts for every browser image in browsers set sometimes you may need to add more entries for particular test cases. This can be easily achieved with:
hosts: ["example.com:192.168.0.1", "test.com:192.168.0.2"]
Entries from this capability will be override /etc/hosts entries from browsers set.
Custom DNS Servers: nameservers
By default, browser pods are using global Kubernetes DNS settings. Sometimes you may need to override used DNS servers list for particular test cases. This can be easily achieved with:
nameservers: ["192.168.0.1", "192.168.0.2"]
Custom Session Timeout: sessionTimeout
Sometimes you may want to change idle timeout for selected browser session. To achieve this - pass the following capability:
sessionTimeout: "1m30s"
Timeout is always specified in Golang duration format, e.g. 30s or 2m or 1h2m30s and so on.
Mobile Emulation: mobileDevice
This capability configures desired mobile device Mobile Emulation:
"mobileDevice": {
    "deviceName": "Apple iPhone XR",
    "orientation": "landscape"
}
To select which device to emulate use deviceName key:
deviceName: "Apple iPhone XR"
To explicitly specify device screen orientation (portrait or landscape) use orientation key:
orientation: "landscape"
Possible orientation values are: portrait, vertical (alias for portrait), landscape, horizontal (alias for landscape). In statically-typed languages like Java or C# you should use a Map to pass this capability, e.g.:
capabilities.setCapability("moon:options", Map.of(
    "mobileDevice", Map.of(
        "deviceName": "Apple iPhone XR",
        "orientation": "landscape"
    )
));
Pod Labels: labels
Sometimes you may want to pass additional metadata to every browser session: environment, VCS revision, build number, project name and so on. These labels can be then used to get various browser usage statistics.
labels: {"project": "MyCoolProject", "build-number": "14353"}
Labels from this capability override labels from browsers set. More information about labels is described in Using Custom Kubernetes Labels section.
Browser Log Level: logLevel
| This feature is available since Moon 2.2.0. |
By default, Moon browsers output very limited quality of logs to decrease overall load on Kubernetes and log storage software. You can change logging verbosity using logLevel capability:
logLevel: "INFO"
Supported browsers are: Google Chrome, Microsoft Edge, Opera and Firefox. Possible values for this capability depend on browser type:
| Capability value |
|---|
ALL |
DEBUG |
INFO |
WARNING |
SEVERE |
OFF |
| Capability value |
|---|
fatal |
error |
warn |
info |
config |
debug |
trace |
Enable Additional Fonts: additionalFonts
|
By default, Moon browsers do not provide support for Chinese, Japanese, Thai and other languages. To enable additional fonts containing these symbols add one more capability:
additionalFonts: true
Additional Browser Data: context
|
This capability allows to efficiently upload arbitrary files to browser pod. All required files are packed to a *.tar.gz archive and capability value should contain a download URL to this archive. Detailed description and examples can be found here.
context: "https://example.com/browser-data.tar.gz"
2.2.2. Headless Mode
By default, all browsers in Moon are started with visible browser window. The majority of browsers nowadays support so-called "headless" mode, when browser is opening pages in the background and no window is visible to the user. Usually such mode is enabled by passing --headless flag to browser startup command in Selenium capabilities.
capabilities = {
    "browserName": "chrome",
    "goog:chromeOptions": {
        "args": ["--headless"]
    }
}
Moon automatically detects when browser is started in headless mode. Headless browsers do not require any graphical components like X-server or window manager, so Moon does not start such components when not needed. Because of this feature, there is no need to additionally pass enableVNC capability to show browser screen in Moon user interface.
2.2.3. Video Recording
| Using video recording requires initial configuration. |
When video recording is configured, recording a video of Selenium session is as easy as adding one capability to your test:
capabilities = {
    "moon:options": {
        "enableVideo": True
    }
}
You can optionally add other capabilities to change recorded video name, screen size, frame rate and so on.
2.2.4. Mobile Emulation
|
Running automated tests in mobile platforms is nowadays very important. Using a set of real devices connected to server via USB requires too much work to deploy and maintain. Running Android Emulators requires hardware server or virtual machines with nested virtualization enabled. Running iOS Simulators requires to have Apple hardware. Even with correct computing resources tests are slower than on desktop platforms and consume slightly more CPUs and memory per browser.
Your goal however is catching bugs and not deploying complicated browser automation infrastructure. There are a lot of cases when a bug related to mobile version of tested web application can be reproduced simply by having exactly the same screen size and User-Agent HTTP header being sent by browser. This feature is already available in Chromium-based browsers and is called Mobile Emulation.
Example capabilities to enable this functionality are shown below:
ChromeOptions options = new ChromeOptions();
options.setCapability("browserVersion", "96.0");
options.setCapability("moon:options", Map.of(
    "mobileDevice", Map.of(
        "deviceName", "Apple iPhone XR",
        "orientation", "landscape",
)));capabilities = {
"browserName": "chrome",
"browserVersion": "96.0",
"moon:options": {
"mobileDevice": {
"deviceName": "Apple iPhone XR",
"orientation": "landscape"
}
}
}Moon comes with a preconfigured list of supported devices stored in devices set. Full list of available devices is available in Supported Mobile Devices section. In order to add your own mobile devices definitions - simply update this list.
2.2.5. Accessing Clipboard
Sometimes you may need to interact with the clipboard to check that your application copy-paste feature works. Moon has a dedicated API to interact with the clipboard:
-
Start a new session, for example with ID
firefox-95-0-f2bcd32b-d932-4cdc-a639-687ab8e4f840. -
To get clipboard value send the following HTTP request:
$ curl -H 'Accept: application/json' https://moon.example.com/wd/hub/session/firefox-95-0-f2bcd32b-d932-4cdc-a639-687ab8e4f840/aerokube/clipboard

{"value": "some-clipboard-value", "media": ""}
If clipboard contains an image, then response will contain Base64-encoded image bytes:
{"value": "iVBORw0KGgoAAAAN....", "media": "image/png"} -
To update clipboard with text value:
$ curl -X POST -H 'Content-Type: application/json' --data '{"value": "some-clipboard-value"}' https://moon.example.com/wd/hub/session/firefox-95-0-f2bcd32b-d932-4cdc-a639-687ab8e4f840/aerokube/clipboard -
To update clipboard with image value, send Base64-encoded image bytes and :
$ curl -X POST -H 'Content-Type: application/json' --data '{"value": "iVBORw0KGgoAAAAN....", "media": "image/png"}' https://moon.example.com/wd/hub/session/firefox-95-0-f2bcd32b-d932-4cdc-a639-687ab8e4f840/aerokube/clipboard
2.2.6. Uploading Files to Browser
Uploading files to browser is a built-in Selenium feature supported in the majority of Selenium clients. How to do this in different programming languages is shown below:
// Find file input element
WebElement input = driver.findElement(By.cssSelector("input[type='file']"));

// Make sure element is visible
((JavascriptExecutor) driver).executeScript("arguments[0].style.display = 'block';", input);

// Configure your client to upload local files to remote Selenium instance
driver.setFileDetector(new LocalFileDetector());

// Specify you local file path here (not path inside browser container!)
input.sendKeys("/path/to/file/on/machine/which/runs/tests");// Find file input element
WebElement fileInput = driver.elements().findFirst(By.cssSelector("input[type='file']"));
// Upload file
Path fileToUpload = Paths.get("/path/to/file/on/machine/which/runs/tests");
String fileRemotePath = driver.document().uploadFile(fileToUpload);
// Set file input field value to remote uploaded file path
fileInput.sendKeys(fileRemotePath);from selenium.webdriver.remote.file_detector import LocalFileDetector
# ...
# Find input field
input = driver.find_element_by_css_selector("input[type='file']")
# Make sure it is visible
driver.execute_script("arguments[0].style.display = 'block';", input)
# Upload file
driver.file_detector = LocalFileDetector()
input.send_keys("/path/to/file/on/machine/which/runs/tests")// Create driver instance
ChromeOptions options = new ChromeOptions();
IWebDriver driver = new RemoteWebDriver(new Uri("https://moon.example.com/wd/hub"), options);
// Open page
driver.Navigate().GoToUrl("https://example.com/");
// Upload file
IAllowsFileDetection allowsDetection = (IAllowsFileDetection)driver;
allowsDetection.FileDetector = new LocalFileDetector();
driver.FindElement(By.Id("uploadfile_0")).SendKeys("/tmp/file.txt");var filePath = path.join('/path/to/file/on/machine/which/runs/tests');
var remoteFilePath = browser.uploadFile(filePath);
$("input[type='file']").setValue(remoteFilePath);2.2.7. Providing Additional Browser Data
|
Often when working with a browser you may need to use additional data: browser extensions, test files to be uploaded, browser settings files (also known as browser profile) and so on. In standard Selenium every such additional file is uploaded with different code snippet. The most important thing is that anyway all such data is being uploaded as HTTP request body. Every time you send file like this your Selenium implementation needs to read all the bytes into memory and this dramatically increases memory consumption. A lot more efficient way of delivering the same functionality is packing all required files to a single archive (e.g. on your CI server). An URL to this archive is then sent as a Selenium capability, thus allowing every browser session to download it before actually launching the browser. We call an archive like this a browser context and respective capability is named just context:
context: https://example.com/browser-data.tar.gz
When you provide context capability, Moon will download an archive and unpack it to /home/<user> directory, where <user> is name of the user configured in configuration object. Default username is just user, so default directory is /home/user/.
browser-data.tar.gz    ===>     /home/user
|                               |
---- some-file.txt              ---- some-file.txt
---- some-directory             ---- some-directory
     |                               |
     ---- another-file.xpi           ---- another-file.xpi
     ---- one-more-file.png          ---- one-more-file.png
To create an archive with browser context:
$ tar cvzf browser-data.tar.gz some-file.txt some-directory # Add an arbitrary number of files and directories herePossible use cases of this feature include:
-
Uploading files to browser. You pack any test files and just set their path to file input fields or open them in the browser.
Capabilities to upload test files to browser{ "browserName":"chrome", "moon:options":{"context":"https://example.com/browser-data.tar.gz"} }The same as HTTP request:
An HTTP request to upload test files to browser$ curl https://moon.example.com/wd/hub/session -d'{"capabilities":{"alwaysMatch":{"browserName":"chrome", "moon:options":{"context":"https://example.com/browser-data.tar.gz"}}}}'Now just use unpacked files in your Selenium code:
Using uploaded files from context// Find file input element WebElement input = driver.findElement(By.cssSelector("input[type='file']")); // Specify path of the file from context directory input.sendKeys("/home/user/some-directory/one-more-file.png"); // You can also open files from context directory in browser driver.get("file:///home/user/some-file.txt"); -
Using browser extensions. You repack your extension (
extension.crx) to the archive (extension.tar.gz) and then load it using browser command-line flags. To repack extension:How to repack extension to*.tar.gz$ unzip extension.crx -d extension # The same works for *.xpi as both are zip archives $ tar cvzf extension.tar.gz extensionRespective capabilities can look like this:
Capabilities to use a browser extension{ "browserName":"chrome", "goog:chromeOptions":{ "args":[ "--disable-extensions-except=/home/user/extension", "--load-extension=/home/user/extension" ] }, "moon:options":{"context":"https://example.com/extension.tar.gz"} }The same as HTTP request:
An HTTP request to use browser extension$ curl https://moon.example.com/wd/hub/session -d'{"capabilities":{"alwaysMatch":{"browserName":"chrome", "goog:chromeOptions":{"args":["--disable-extensions-except=/home/user/extensions","--load-extension=/home/user/extensions"]}, "moon:options":{"context":"https://example.com/extensions.tar.gz"}}}}' -
Overriding browser profile. You pack a directory with browser profile (
profile) to the archive (profile.tar.gz) and then load it using browser command-line flags. Respective capabilities for Chrome can look like this:Capabilities to override Chrome profile{ "browserName":"chrome", "goog:chromeOptions":{ "args":["--user-data-dir=/home/user/profile"] }, "moon:options":{"context":"https://example.com/profile.tar.gz"} }The same as HTTP request:
An HTTP request to override Chrome profile$ curl https://moon.example.com/wd/hub/session -d'{"capabilities":{"alwaysMatch":{"browserName":"chrome", "goog:chromeOptions":{"args":["--user-data-dir=/home/user/profile"]}, "moon:options":{"context":"https://example.com/profile.tar.gz"}}}}'For Firefox approach remains the same but command-line flags differ:
Capabilities to override Firefox profile{ "browserName":"firefox", "moz:firefoxOptions":{ "args":["-profile","/home/user/profile"] }, "moon:options":{"context":"https://example.com/profile.tar.gz"} }The same as HTTP request:
An HTTP request to override Firefox profile$ curl https://moon.example.com/wd/hub/session -H'Content-Type: application/json' -d'{"capabilities":{"alwaysMatch":{"browserName":"firefox", "moz:firefoxOptions":{"args":["-profile","/home/user/profile"]}, "moon:options":{"context":"https://example.com/profile.tar.gz"}}}}' -
Overriding various user settings. Previously we understood that browser context archive is unpacked to user home directory in browser pod. You can use this to override various operating system configuration files (
~/.bashrc,~/.gtkrc-3.0to e.g. turn off cursor blinking) and directories (~/.ssh,~/.gpgand so on). -
Emulating web camera video. You upload a video file to browser pod and then use it as fake web camera video. You start by preparing a fake video:
Converting an *.mp4 video to *.y4m$ mkdir webcam-video $ ffmpeg -i my-video.mp4 -vf hflip -pix_fmt yuv420p -s 1280x720 webcam-video/webcam-video.y4mThen you add resulting video to an archive:
Creating an archive with video$ tar cvzf webcam-video.tar.gz webcam-videoHaving an archive you can now create a Chrome session with the following capabilities:
Capabilities for Chrome web camera emulation{ "browserName":"chrome", "goog:chromeOptions":{ "args":[ "--disable-gpu", "--use-fake-ui-for-media-stream", "--use-fake-device-for-media-stream", "--use-file-for-fake-video-capture=/home/user/webcam-video/webcam-video.y4m" ] }, "moon:options":{"context":"https://example.com/webcam-video.tar.gz"} }The same as HTTP request:
An HTTP request to emulate web camera in Chrome$ curl https://moon.example.com/wd/hub/session -H'Content-Type: application/json' -d'{"capabilities":{"alwaysMatch":{"browserName":"chrome", "goog:chromeOptions":{"args":["--disable-gpu", "--use-fake-ui-for-media-stream", "--use-fake-device-for-media-stream", "--use-file-for-fake-video-capture=/home/user/webcam-video/webcam-video.y4m"]},"moon:options":{"context":"https://example.com/webcam-video.tar.gz"}}}'
2.2.8. Accessing Files Downloaded with Browser
|
Your tests may need to download files with browsers. To analyze these files a common requirement is then to somehow extract downloaded files from browser containers. Moon provides an API to work with such files:
-
Start a new session, for example with ID
firefox-95-0-f2bcd32b-d932-4cdc-a639-687ab8e4f840. -
In tests code save all files to
/home/<user>/Downloadsdirectory, where<user>is name of the user configured in configuration object. Default username is justuser, so default directory is/home/user/Downloads. -
To list available files:
curl -H 'Accept: application/json' https://moon.example.com/wd/hub/session/firefox-95-0-f2bcd32b-d932-4cdc-a639-687ab8e4f840/aerokube/download/ ["myfile.txt", "another-file.png"] -
Access any file contents using the following URL:
curl https://moon.example.com/wd/hub/session/firefox-95-0-f2bcd32b-d932-4cdc-a639-687ab8e4f840/aerokube/download/myfile.txt file-contents-go-here -
To delete a file:
curl -X DELETE https://moon.example.com/wd/hub/session/firefox-95-0-f2bcd32b-d932-4cdc-a639-687ab8e4f840/aerokube/download/myfile.txt -
Close the session
2.2.9. Accessing Developer Tools
|
Selenium 4 and above has bidirectional functionality allowing to access advanced browser features. This works just out of the box. An example project demonstrating how to use it stored here.
Moon 1.x and Selenoid have custom /devtools/ API allowing direct access to browser using Chrome Developer Tools Protocol. For backwards compatibility this is also supported in Moon 2.x. In W3C WebDriver standard Selenium extension commands should be located under vendor prefix, so having a Selenium session ID to access this API in Moon 2 you have to use URL like this:
wss://moon.example.com/wd/hub/session/<session-id>/aerokube/devtools2.2.10. Changing Browser Locale
In some test cases you may need to override preferred browser locale. You can do this with standard Selenium capabilities. How to override locale depends on browser.
Firefox
FirefoxOptions options = new FirefoxOptions();
options.setCapability("browserVersion", "75.0");
options.addPreference("intl.accept_languages", "de");
WebDriver driver = new RemoteWebDriver(new URL("https://moon.example.com/wd/hub"), options);
Chromium-based Browsers
ChromeOptions options = new ChromeOptions();
options.setCapability("browserVersion", "81.0");
options.setCapability("moon:options", Map.of(
    "env", Arrays.asList("LANG=de_AT.UTF-8", "LANGUAGE=at:de", "LC_ALL=de_AT.UTF-8")
));
WebDriver driver = new RemoteWebDriver(new URL("https://moon.example.com/wd/hub"), options);
2.2.11. Changing Browser Time Zone
A common testing task is checking that your web application behaves as expected in different time zones. Depending on tested web application one of the following approaches can help.
Option 1: Setting TZ environment variable
A typical approach for overriding time zone in Linux is setting TZ environment variable. To do this in Moon - you just need to set env capability in your code:
ChromeOptions options = new ChromeOptions();

capabilities.setCapability("moon:options", Map.of(
    "env", Arrays.asList("TZ=America/New_York") // This is where you set TZ variable with values like "America/New_York" or "Europe/London"
));

WebDriver driver = new RemoteWebDriver(new URL("https://moon.example.com/wd/hub"), options);

driver.get("https://dateful.com/time-zone-converter"); // An example web site that respects TZ setting
When you set time zone like this, web application can fetch your time zone information using Javascript Time API. The main problem with this approach is that not all web applications are using it. So if it does not work - then try the next option.
Option 2: Overriding Browser Geolocation
Some web applications are applying time zone settings by analyzing browser geolocation information using Javascript Geolocation API. If setting time zone directly does not work, you may try to override geolocation API coordinates:
ChromeOptions options = new ChromeOptions();
WebDriver driver = new RemoteWebDriver(new URL("https://moon.example.com/wd/hub"), options);
driver = new Augmenter().augment(driver);

DevTools devTools = ((HasDevTools) driver).getDevTools();
devTools.createSession();

// Location of London (change this to 40.715502419712244, -74.00597334074466 for New York)
devTools.send(Emulation.setGeolocationOverride(Optional.of(51.495930861102245),
        Optional.of(0.010205721644136127),
        Optional.of(1)));

driver.get("https://google.com");
WebElement element = driver.findElement(By.name("q"));
Actions actionProvider = new Actions(driver);
Action select = actionProvider
        .sendKeys("what is my time zone\n")
        .build();
select.perform();
In some rare cases when both options do not work, this can be a signal that your web application is detecting your time zone by comparing your IP address with IP addresses geolocation database. In that case you may need to configure your browser to go through a proxy server physically located in desired geographic region.
2.2.12. Using External Hosts
Moon expects to run the majority of browsers in pods inside Kubernetes or Openshift cluster. However sometimes you may need to run Selenium tests on some external hosts: hardware servers or virtual machines. Mainly this could be needed in two situations:
-
Running Selenium tests on complicated platforms such as MacOS or iOS. According to license agreement these platforms require Apple hardware devices, and it is complicated to run Kubernetes on top of these devices.
-
Using Selenium online platforms for some browsers. In that case you can run the majority of browsers (e.g. Firefox, Chrome, Opera) in Moon and complicated browsers (don’t work on standard virtual machines) such as Chrome Mobile or real devices in external Selenium platform.
To use external hosts you should have the following:
-
A set of hosts with Selenium-compatible solution (Selenoid, Appium, Selenium Grid, etc.):
host1.example.com:4444,host1.example.com:4444and so on. -
Optionally a VNC server listening on every such host on standard port
5900. Every VNC server should be password protected with the same password having 8+ characters.
For every browser type you need to add the following to browsers set:
selenium:
    "internet explorer":
      default: 1.0.0
      repository: aerokube/moon-external-host
      env:
        - name: URLS
          value: "[\\\"http://host1.example.com:4444/\\\", \\\"http://host2.example.com:4444/\\\"]" # A list of external hosts
        - name: VNC_PASSWORD
          value: "myvncpassword" # At least 8 symbols
      ]
With such configuration Selenium session requests with be randomly load-balanced across the hosts specified in URLS environment variable. VNC feature should also work - you should be seeing remote host screen in Moon UI.
2.2.13. Using Proxy Servers
| Using proxy with username and password is available since Moon 2.5.0. |
In some cases you may need to configure launched browser to go through some proxy server. Selenium WebDriver protocol supports standard capabilities to configure proxy server for any browser. For example:
ChromeOptions options = new ChromeOptions();
String proxyHost = "proxy.example.com:3128";
capabilities.setCapability("proxy", Map.of(
    "proxyType", "manual",
    "httpProxy", proxyHost,
    "sslProxy", proxyHost,
));
WebDriver driver = new RemoteWebDriver(new URL("https://moon.example.com/wd/hub"), options);
For some programming languages there is a wrapper object called Proxy allowing to set the same value in more type-safe way:
ChromeOptions options = new ChromeOptions();
Proxy proxy = new Proxy();
String proxyHost = "proxy.example.com:3128";
proxy
    .setProxyType(Proxy.ProxyType.MANUAL)
    .setHttpProxy(proxyHost)
    .setSslProxy(proxyHost);
options.setProxy(proxy);
WebDriver driver = new RemoteWebDriver(new URL("https://moon.example.com/wd/hub"), options);
Very often proxy servers require to provide username and password for authentication. While the majority of Selenium implementations don’t work with such proxy servers, Moon allows to configure authentication out of the box, using the same capabilities - simply add username and password to proxy host value (username:password@host:port):
ChromeOptions options = new ChromeOptions();
// Note username:password on the line below
String proxyHost = "username:password@proxy.example.com:3128";
capabilities.setCapability("proxy", Map.of(
    "proxyType", "manual",
    "httpProxy", proxyHost,
    "sslProxy", proxyHost,
));
WebDriver driver = new RemoteWebDriver(new URL("https://moon.example.com/wd/hub"), options);
2.3. Using Cypress
|
Moon is able to run Cypress tests out of the box. To do this:
-
Install a tool allowing to execute Cypress tests remotely:
$ npm install @aerokube/cypress-moon -
Run your tests against Moon cluster:
$ cd /path/to/my-test-project
my-test-project$ cypress-moon https://moon.example.com/cypress/chrome
Each call of
cypress-mooncommand will start a new browser in Moon.
|
Cypress compared to Selenium has no capabilities concept. The only way to request an exact browser type or additional features is passing all these requirements in HTTP endpoint URL. Next section describes supported URL naming conventions.
2.3.1. Selecting Requested Browser
You can request one of browsers supported by Cypress (chrome, chromium, edge, electron or firefox) by specifying its name in URL. By default, Moon will use browsers/cypress-<browser-name>:latest public image.
quay.io/browsers/cypress-chrome:latest image)$ cypress-moon https://moon.example.com/cypress/chromequay.io/browsers/cypress-chromium:latest image)$ cypress-moon https://moon.example.com/cypress/chromiumquay.io/browsers/cypress-electron:latest image)$ cypress-moon https://moon.example.com/cypress/electronquay.io/browsers/cypress-edge:latest image)$ cypress-moon https://moon.example.com/cypress/edgequay.io/browsers/cypress-firefox:latest image)$ cypress-moon https://moon.example.com/cypress/firefox2.3.2. Selecting Exact Cypress Version
Cypress API can change from version to version. Because of that it is recommended to make sure that Cypress version being used in your project corresponds to Cypress version in browser image. To use an image compatible with exact Cypress version - add this version as follows:
quay.io/browsers/cypress-electron:cypress-7.3.0 image)$ cypress-moon https://moon.example.com/cypress/electron/cypress-7.3.02.3.3. Video Recording
To enable video recording - simply add enableVideo parameter to URL:
$ cypress-moon https://moon.example.com/cypress/electron/cypress-7.3.0?headless=false&enableVideo=trueYou can optionally add other parameters to change recorded video name, screen size, frame rate and so on.
2.3.4. Enabling Additional Features
In addition to selecting Cypress version - you can enable additional features like changing screen resolution, passing custom test name and so on. All these optional features are set by adding parameters to URL:
$ cypress-moon https://moon.example.com/cypress/electron/cypress-7.3.0?noExit=true&headless=false&env=LANG%3Dde_AT.UTF-8&env=LANGUAGE%3Dat:deFull list of supported parameters and their meaning is shown below.
| Parameter name | Possible values | Default value | Description |
|---|---|---|---|
additionalFonts |
|
|
Enable additional fonts for Chinese, Japanese, Thai and other languages. |
configFile |
Custom Cypress configuration file |
Not set |
Path to custom Cypress configuration file. Supported for Cypress 9.0.0 and above. |
enableVideo |
|
|
Enable video recording. |
env |
Environment variables |
Not set |
One or more environment variables that will be visible to the browser. Can be passed multiple times: |
headless |
|
|
Whether to run browser in headless mode. |
host |
A typical |
Not set |
Allows to explicitly add |
label |
Kubernetes pod labels |
Not set |
One or more custom Kubernetes labels that will be added to browser pod. Can be passed multiple times: |
name |
Any human-readable string |
Not set |
Allows to set custom test name (same meaning as |
nameserver |
DNS server name, e.g. |
Not set |
Allows to explicitly set one or several DNS servers for browser. Can be passed multiple times. |
noExit |
|
|
Whether to leave container running after executing all tests. Mainly needed for debugging purposes. |
pattern |
A string with placeholders |
|
A custom S3 key pattern used to save videos to S3 bucket. |
screenResolution |
|
|
Sets resolution of the desktop where browser is running. Use Cypress methods to set browser window size. |
spec |
Cypress test spec file name (e.g. |
Not set |
Allows to run one or more concrete test files. Can be passed multiple times. |
videoCodec |
Codec to be used for video encoding, e.g. |
|
Allows to change codec used for video recording. |
videoFrameRate |
Positive number |
12 |
Recorded video frame rate. |
videoName |
Video file name with extension |
|
Recorded video file name. |
videoScreenSize |
|
Equals to |
Recorded video screen size. If value is smaller than |
2.3.5. Recording Runs to Cypress Dashboard
| This feature works with Cypress images 9.6.0 and above. |
Cypress provides Cypress Dashboard - an online service for storing test runs information. To send information about executed tests to this service you have to send your access key using CYPRESS_RECORD_KEY environment variable:
$ cypress-moon https://moon.example.com/cypress/chrome/cypress-9.6.0?&env=CYPRESS_RECORD_KEY%3Dyour-key2.4. Using Playwright
|
Moon is able to run browser images for Playwright framework out of the box. An example Playwright test that will work with Moon looks like the following:
const { firefox } = require('playwright');

(async () => {
  const browser = await firefox.connect({ timeout: 0, wsEndpoint: 'wss://moon.example.com/playwright/firefox/playwright-1.23.3' });
  const page = await browser.newPage();
  await page.goto('https://aerokube.com/moon/');
  await page.screenshot({ path: `screenshot.png` });
  await browser.close();
})();
You can see that the only difference from standard Playwright example is a web socket endpoint URL. Playwright compared to Selenium has no capabilities concept. The only way to request an exact browser version or environment variables is passing all these requirements in websocket endpoint URL. Next section describes supported URL naming conventions.
|
If your Moon instance is accessible over HTTPS connection (e.g. |
2.4.1. Selecting Requested Browser
You can request one of browsers supported by Playwright (chrome, chromium, firefox or webkit) by specifying its name in URL. By default, Moon will use quay.io/playwright-<browser-name> repository to download images. Currently, Playwright API can change from version to version. Because of that it is recommended to make sure that Playwright client version being used in your code corresponds to Playwright server version in browser image. To use an image compatible with exact Playwright version - add this version as follows:
quay.io/browser/playwright-chromium:playwright-1.23.3 image)wss://moon.example.com/playwright/chromium/playwright-1.23.3quay.io/browser/playwright-chrome:playwright-1.23.3 image)wss://moon.example.com/playwright/chrome/playwright-1.23.3quay.io/browser/playwright-firefox:playwright-1.23.3 image)wss://moon.example.com/playwright/firefox/playwright-1.23.3quay.io/browser/playwright-webkit:playwright-1.23.3 image)wss://moon.example.com/playwright/webkit/playwright-1.23.32.4.2. Video Recording
To enable video recording - simply add enableVideo parameter to URL:
wss://moon.example.com:4444/playwright/firefox/playwright-1.23.3?headless=false&enableVideo=trueYou can optionally add other parameters to change recorded video name, screen size, frame rate and so on.
2.4.3. Additional Browser Data
Similarly to Selenium, you can make browser pod automatically download arbitrary files as a single archive and unpack them to user directory. This feature is described in detail here. The main particularity in Playwright is that archive URL is being passed as Playwright context URL parameter and thus needs to be URL encoded.
wss://moon.example.com:4444/playwright/chrome/playwright-1.23.3?context=http%3A%2F%2Fexample.com%2Fbrowser-data.tar.gzFor example to upload a browser extension:
var browser = await chromium.connect({ timeout: 0, wsEndpoint: 'wss://moon.example.com/playwright/chrome/playwright-1.23.3?headless=false&context=https%3A%2F%2Fexample.com%2Fextensions.tar.gz&arg=--disable-extensions-except%3D%2Fhome%2Fuser%2Fextensions&arg=--load-extension%3D%2Fhome%2Fuser%2Fextensions' });2.4.4. Enabling Additional Features
In addition to selecting browser and its version - you can enable additional features like using headless browser versions, passing environment variables and so on. All these optional features are set by adding parameters to URL:
wss://moon.example.com/playwright/chrome/playwright-1.23.3?headless=false&arg=--use-glFull list of supported parameters and their meaning is shown below.
| Parameter name | Possible values | Default value | Description |
|---|---|---|---|
additionalFonts |
|
|
Enable additional fonts for Chinese, Japanese, Thai and other languages. |
arg |
Browser command-line arguments |
Not set |
One or more additional command-line arguments to be passed to browser. This parameter can be passed multiple times: |
context |
Browser context HTTP URL |
Not set |
An HTTP URL for |
devtools |
|
|
Whether to show Chrome Developer Toolbar (only applicable to |
enableVideo |
|
|
Enable video recording. |
env |
Environment variables |
Not set |
One or more environment variables that will be visible to the browser. Can be passed multiple times: |
headless |
|
|
Whether to run browser in headless mode. |
host |
A typical |
Not set |
Allows to explicitly add |
label |
Kubernetes pod labels |
Not set |
One or more custom Kubernetes labels that will be added to browser pod. Can be passed multiple times: |
name |
Any human-readable string |
Not set |
Allows to set custom test name (same meaning as |
nameserver |
DNS server name, e.g. |
Not set |
Allows to explicitly set one or several DNS servers for browser. Can be passed multiple times. |
pattern |
A string with placeholders |
|
A custom S3 key pattern used to save videos to S3 bucket. |
screenResolution |
|
|
Sets resolution of the desktop where browser is running. Use Playwright methods to set browser window size. |
videoCodec |
Codec to be used for video encoding, e.g. |
|
Allows to change codec used for video recording. |
videoFrameRate |
Positive number |
12 |
Recorded video frame rate. |
videoName |
Video file name with extension |
|
Recorded video file name. |
videoScreenSize |
|
Equals to |
Recorded video screen size. If value is smaller than |
2.5. Using Chrome Developer Tools
|
Moon can automate browsers using Chrome Developer Tools Protocol. This allows you to run tests in parallel using libraries like Puppeteer or Taiko. In order to start a new browser with these tools - simply use the following URL:
wss://moon.example.com/devtools/chrome|
If your Moon instance is accessible over HTTPS connection (e.g. |
An example Puppeteer test is shown below:
const puppeteer = require('puppeteer-core');
const host = 'moon.example.com';
(async () => {
    const devtools = await puppeteer.connect(
        { timeout: 0, browserWSEndpoint: `wss://${host}/devtools/chrome` }
    ); // For every call of this method a new browser is started
    const page = await devtools.newPage();
    await page.goto('https://aerokube.com');
    await page.screenshot({path: 'screenshot.png'});
    const title = await page.title();

    console.log(title);

    await devtools.close();
})();
2.5.1. Selecting Requested Browser
You can choose desired browser version by changing connection URL:
cdtp/chrome:85.0 image)wss://moon.example.com/devtools/chrome/85.02.5.2. Video Recording
To enable video recording - simply add enableVideo parameter to URL:
wss://moon.example.com/devtools/chrome/85.0?headless=false&enableVideo=trueYou can optionally add other parameters to change recorded video name, screen size, frame rate and so on.
2.5.3. Enabling Additional Features
You can enable additional features by changing connection URL:
wss://moon.example.com/devtools/chrome?headless=false&nameserver=ns1.example.com| Parameter name | Possible values | Default value | Description |
|---|---|---|---|
additionalFonts |
|
|
Enable additional fonts for Chinese, Japanese, Thai and other languages. |
arg |
Browser command-line arguments |
Not set |
One or more additional command-line arguments to be passed to browser. This parameter can be passed multiple times: |
devtools |
|
|
Whether to show Chrome Developer Toolbar. |
enableVideo |
|
|
Enable video recording |
env |
Environment variables |
Not set |
One or more environment variables that will be visible to the browser. Can be passed multiple times: |
headless |
|
|
Whether to run browser in headless mode. |
host |
A typical |
Not set |
Allows to explicitly add |
label |
Kubernetes pod labels |
Not set |
One or more custom Kubernetes labels that will be added to browser pod. Can be passed multiple times: |
name |
Any human-readable string |
Not set |
Allows to set custom test name. |
nameserver |
DNS server name, e.g. |
Not set |
Allows to explicitly set one or several DNS servers for browser. Can be passed multiple times. |
pattern |
A string with placeholders |
|
A custom S3 key pattern used to save videos to S3 bucket. |
screenResolution |
|
|
Sets resolution of the desktop where browser is running. |
videoCodec |
Codec to be used for video encoding, e.g. |
|
Allows to change codec used for video recording. |
videoFrameRate |
Positive number |
12 |
Recorded video frame rate. |
videoName |
Video file name with extension |
|
Recorded video file name. |
videoScreenSize |
|
Equals to |
Recorded video screen size. If value is smaller than |
3. Configuration
3.1. License Key
|
A typical license key is a text file with *.key extension that looks like this:
$ cat license.key
MG1RSVdpc2Z6YjdQQVZjd2lpei9KMkd1T3dzMTFuL1dlRjVSc3NOMUcxZk9QaUxWa3Q5SnBIakIxa09wWm0vVFJqQ0tsa21xVG1OODVRZnlQbjBjVmRHVWFLampTOFF1a3VLRXRPcEUwbnEySG16QWFQWHRDYTVjMm9jZzZFaUJqeFd5ODE4UFBHZzNCNWpCYXlha3oweFBscFl1RnB0V0U1Q3FwOGl5VDdKTk9abG5aSmlPdnRmZDFvSG1nNnVwVXBLV2E4RmYwWHcreERIR29ZTE1XTldPb1hvT2ZCUnZpcDhPWW05a1FqN0hBWWVOYUtLT1lPWlVJa1dsb1gxdjNOT1htTFpZalhsQ3h1Q3V6NWhiQjIwSjVIY0JTYnZybm9zYm14RXFkSFpQWVBKWUlKTzZvVlBnODhQeFErZ1EyTk5sWG82TC9XeXU3aisrNU0rSEdPcXlOSEdlNGx4Zm1nNVhjMWlnNkN1OCtNSVVYRzNqUllqOUY4ZHdReWpSbFNMNmFpL2dRQnc3TzY0U0lwdVF2d29jYi9kVzFSYWFRVkd3ZXYrOVdING8zRWRrYkVONUhRTmQ2MUxsUnFNdmtKeWVHV21tVlVUZ2dsMDRsTFFLTmZNVG81L2JVakNBMGhNeER5VHNJdmVRRGFMMklvTWpvcFk4VERlK1U2bUJvUDVxNVYrcCtDQVhjbjYxQlRaUVp0bmNqL0JBVkdNOEZ4NW9rWHRYSVAxUkY0a1VCckZVTDFyTWF1VkZqSk5xU1pLT293dUpMTTg2SEZ0Sld0eUlRK3ZZZm1pZU0xM292MnVleDBoRlhRdFkvMkt1dUhhN3dKV2pFT0pqaEVzTjhXSy82ZlFFbi9EQzcrNkw3NzhlbmVVZ2lLZ3VFbjlMMXZMYVZ5VWtQaWc9O2V5SnNhV05sYm5ObFpTSTZJa1JsWm1GMWJIUWlMQ0p3Y205a2RXTjBJam9pVFc5dmJpSXNJbTFoZUZObGMzTnBiMjV6SWpvMGZRPT0=
In Moon 1.x license key was stored in Kubernetes secret and was mounted to Moon pod as a regular file. In Moon 2.x license keys (or just licenses) are stored in custom Kubernetes resource.
3.1.1. Listing License Keys
|
Contrarily to other resources introduced by Moon, licenses are stored cluster-wide. Thus, you don’t need to provide namespace name in the following commands ( |
To list available licenses:
$ kubectl get licenses
NAME   LICENSEE   SESSIONS   EXPIRES   STATUS   NAMESPACE
moon   Default    4          Never     Ok       moon
The output above is shown when the free license key is used. Columns meaning is as follows:
-
Name. License key object name.
-
Licensee. License key owner name. Usually equals to company name, e.g.
Acme LLC. For free license key with 4 parallel sessions equals toDefault. -
Sessions. Maximum number of browser sessions available in this license key.
-
Expires. The number of days this license key expires in. Equals to
Alreadywhen license key already expired and equals toNeverif license key never expires. -
Status. License key status. Can be one of:
Ok- license key is active,Expired- license key has expired,Broken- invalid license key data was provided. -
Namespace. Name of Kubernetes namespace where this license key is used.
You may have multiple custom Kubernetes resources named license. In that case in order to work with Moon licenses - simply use fully qualified resource name:
$ kubectl get licenses.moon
NAME   LICENSEE   SESSIONS   EXPIRES   STATUS   NAMESPACE
moon   Default    4          Never     Ok       moon

$ kubectl get licenses.moon.aerokube.com
NAME   LICENSEE   SESSIONS   EXPIRES   STATUS   NAMESPACE
moon   Default    4          Never     Ok       moon
To view a license key in YAML format:
$ kubectl get license moon -o yaml
apiVersion: moon.aerokube.com/v1
kind: License
metadata:
  name: moon                        (1)
  # Other Kubernetes metadata
spec:
  data: MG1RSVdpc2Z6YjdQQV....      (2)
  namespace: moon                   (3)
status:
# Other keys and values| 1 | License key name |
| 2 | License key contents |
| 3 | Namespace where this license key should be used |
3.1.2. Updating a License Key
To update an existing license key - simply update data field in respective license object:
$ kubectl edit license moon # Replace data field with your new license key in text editor, save and exitWhen you update a license key - all changes are applied immediately. This usually also leads to graceful Moon pods restart (does not interrupt running browser sessions).
3.1.3. Multiple License Keys
Moon 2.x supports sharing the same license key among several Kubernetes namespaces and in the majority of cases a single license key should be enough. However, in some cases you may want to use a separate Moon instance and a separate license key for some teams. To achieve this:
-
Deploy two independent Moon clusters to namespace
ns1andns2 -
Create two license objects with
namespacefield set tons1andns2and save them to file (e.g.license-keys.yaml):License keys to be created$ cat license-keys.yaml apiVersion: moon.aerokube.com/v1 kind: License metadata: name: license-key-ns1 spec: data: <license-key-1> namespace: ns1 --- apiVersion: moon.aerokube.com/v1 kind: License metadata: name: license-key-ns2 spec: data: <license-key-2> namespace: ns2 -
Apply resulting file:
$ kubectl apply -f license-keys.yaml-
If you try to create two license keys with the same
datafield value, then one of them will be considered as a duplicate and automatically deleted. -
If you have two different license keys with the same
namespacefield, then Moon will always choose the most recently created one.
-
-
License keys will be applied automatically, and you will see the following in licenses list:
Two license keys are applied$ kubectl get licenses NAME LICENSEE SESSIONS EXPIRES STATUS NAMESPACE license-key-ns1 Acme Inc. 10 32d Ok ns1 license-key-ns2 Acme Inc. 20 27d Ok ns2
3.1.4. Deleting a License Key
To delete an existing license key - simply delete respective license object:
$ kubectl delete license moonWhen you delete the last license key with namespace field set to some Moon namespace, Moon will automatically fall back to the free license key with 4 parallel sessions included.
3.1.5. License Key Expiration
There are several ways to always have active Moon license keys:
Option 1: Check Expiring License Keys with kubectl
The easiest way to check for expiring or expired license keys is just listing them with kubectl:
$ kubectl get licenses
NAME              LICENSEE    SESSIONS   EXPIRES   STATUS   NAMESPACE
license-key-ns1   Acme Inc.   10         32d       Ok       ns1
license-key-ns2   Acme Inc.   20         today     Ok       ns2
You can see that Expires column is showing the number of days remaining for every license key. When a license key expires the same command output will be:
$ kubectl get licenses
NAME              LICENSEE    SESSIONS   EXPIRES   STATUS    NAMESPACE
license-key-ns1   Acme Inc.   10         32d       Ok        ns1
license-key-ns2   Acme Inc.   20         Already   Expired   ns2
For expired license key Expires column will be set to Already and license key status will be Expired.
You can also use Kubernetes API directly instead of kubectl to list license keys and find expiring or expired ones.
|
Option 2: Use Prometheus License Key Expiration Metric
Another possible way of getting license expiration information is using built-in Prometheus metric called moon_license_expire. This is described in detail in monitoring section.
$ curl -s https://moon.example.com/metrics | grep license_expire
# HELP moon_license_expire Moon license expiration time.
# TYPE moon_license_expire gauge
moon_license_expire 1.6444512e+09
These metrics are collected by Prometheus automatically, so you only need to configure alerts and charts if needed.
3.1.6. Updating License Key From An External Secret
In some cases you still may want to store license key in a Kubernetes secret and allow Moon to automatically read license key from this secret. To achieve this we provide a dedicated component called license-ops. This component is a Kubernetes job that reads license key contents from configured secret and automatically updates custom Kubernetes resource being used by Moon. To enabled license-ops you need to install one more Helm chart:
-
Having Moon installed, create a regular Kubernetes secret in Moon namespace with license key contents:
Example secret with license keyapiVersion: v1 kind: Secret metadata: name: licensekey namespace: moon stringData: license.key: MG1RSVdpc2Z6.... # Insert license key contents here -
Now install one more Helm chart (source code can be found here):
Installing license-ops Helm chart$ helm upgrade --install -n moon license-ops aerokube/license-opsTo change secret name, job schedule and other parameters - use Helm values:
Updating license-ops parameters$ helm upgrade --install --set secretName=mysecret --set schedule="0 * * * *" -n moon license-ops aerokube/license-ops
3.2. Users and Quotas
3.2.1. Users
|
Moon 2.x compared to Moon 1.x has no built-in authentication mechanism. This is because the recommended way to deliver authentication in Kubernetes is using available Ingress authentication features or sidecar containers delivering authentication. Moon reads username from X-Moon-Quota HTTP header being set by Ingress or sidecar container. The following sections describe possible authentication configurations.
Basic HTTP Authentication
The most popular authentication method in browser automation now is the so-called basic HTTP authentication. When using this method, username and password are expected to be passed in Authorization HTTP header:
Authorization: Basic base64("username:password")
Also, the following URL notation is supported for using this type of authentication:
https://username:password@example.com/
The simplest way of providing the basic HTTP authentication is configuring Ingress. Below we describe several possible options of configuring basic HTTP authentication in Moon.
Option 1. Nginx Ingress Configured By Helm
|
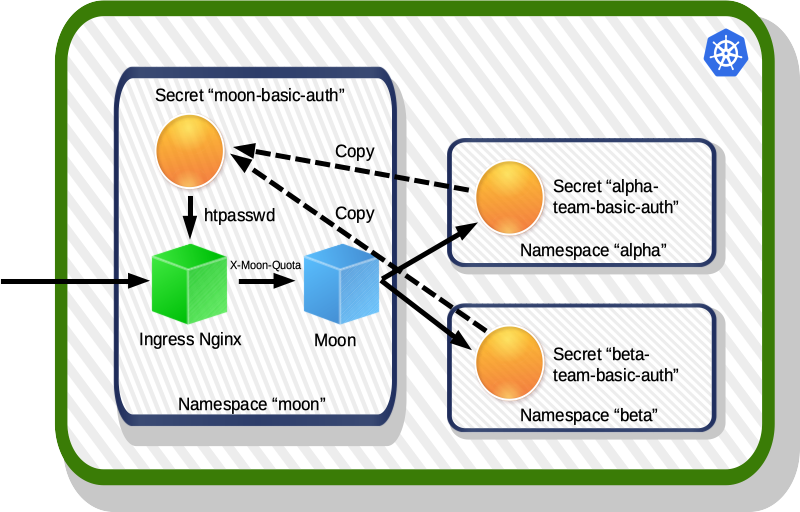
The easiest way of getting a protected Moon cluster with multiple users enabled is using Nginx Ingress instance automatically created by our Helm [chart](https://github.com/aerokube/charts):
-
Add Aerokube charts repository:
$ helm repo add aerokube https://charts.aerokube.com/ $ helm repo update -
Create a
values.yamlfile with Ingress host and a list of users to be created:ingress: host: moon.example.com # Provide cluster hostname here quota: moon: null # This one is needed to disable single-namespace mode in Moon alpha-team: namespace: alpha # Password for this team will be generated automatically beta-team: namespace: beta password: beta-team-password # You can also set password value explicitlyDepending on the number of users setting or not setting
passwordfield behaves differently:Option 1. You have only one user.
-
passwordis missing: no authentication is configured. -
password: ''(empty string): authentication is configured, password is generated. -
password: some-password: authentication is configured, password is set to provided value.
Option 2. You have 2 or more users.
-
passwordis missing or empty string: authentication is configured, password is generated. -
password: some-password: authentication is configured, password is set to provided value.
-
-
Deploy Moon with your
values.yamlapplied:$ helm upgrade --install -f values.yaml -n moon moon aerokube/moon2 -
This will create a separate namespace for every team:
$ kubectl get namespaces
NAME              STATUS   AGE
alpha              Active   40m
beta              Active   40m
# Other namespaces
In every such namespace chart a secret with user password will be automatically created:
$ kubectl get secrets -n alpha
NAME                            TYPE                                  DATA   AGE
alpha-team-basic-auth-password   Opaque                                1      2m11s
# Other secrets
Password is stored in this secret. To print generated password value - simply extract
passwordfield (stored as Base64) from the secret and decode it. A one line command how to do this:$ kubectl get secret alpha-team-basic-auth-password -n alpha -o 'go-template={{index .data "password"}}' | base64 -d 8X4juoCQ9gHAACqbc05B3oPXUcV6Oxb7KNTSYdM15eYF -
Use quota name (
alpha-team,beta-teamand so on) as username and password from the secret. The same credentials should be used in your tests code and to access user interface. In multiple namespaces mode user interface is only showing browser sessions corresponding to one user. -
To protect Moon with TLS encryption - use standard TLS private key (
server.key) and certificate (server.crt) files as follows:$ helm upgrade --install -f values.yaml --set-file ingress.tlsCert=server.crt --set-file ingress.tlsKey=server.key -n moon moon aerokube/moon2
Option 2. Nginx Ingress Configured Manually
|
In this approach we only configure authentication. Multiple namespaces mode is not active. |
To configure Nginx Ingress manually:
-
Create a text file with a list of available users in htpasswd format:
$ htpasswd -Bbn new-user new-user-password >> users.htpasswd # Adding new user
$ htpasswd -Bb users.htpasswd some-user new-password # Updating password
$ htpasswd -D users.htpasswd test-user # Deleting existing user
Resulting file contents will look like this:
$ cat users.htpasswd alpha-team:$apr1$.dZyHlKN$jdoZkin/kPviFNArx/cVL1 # User is alpha-team, password is encrypted beta-team:$apr1$gyqzbSpt$RBNcxrsQaolPZCQZW0VQW1 -
Save file contents to Kubernetes secret as follows:
$ kubectl create secret generic moon-basic-auth --from-file=users.htpasswd -n moon -
Configure Nginx Ingress to use credentials for basic HTTP authentication:
apiVersion: networking.k8s.io/v1
kind: Ingress
metadata:
  name: moon
  namespace: moon
  annotations:
    nginx.ingress.kubernetes.io/force-ssl-redirect: "true"
    nginx.ingress.kubernetes.io/auth-type: basic                                      (1)
    nginx.ingress.kubernetes.io/auth-secret: moon-basic-auth                          (2)
    nginx.ingress.kubernetes.io/auth-realm: 'Authentication Required - Moon Realm'    (3)
    nginx.ingress.kubernetes.io/configuration-snippet: |                              (4)
      proxy_set_header X-Moon-Quota $remote_user;
    nginx.ingress.kubernetes.io/proxy-connect-timeout: "108000"
    nginx.ingress.kubernetes.io/proxy-send-timeout: "108000"
    nginx.ingress.kubernetes.io/proxy-read-timeout: "108000"
spec:
  ingressClassName: nginx
  tls:
  - hosts:
    - moon.example.com
    secretName: moon-tls                                                              (5)
  rules:
  - host: moon.example.com
    http:
      paths:
      - path: /wd/hub
        pathType: Prefix
        backend:
          service:
            name: moon
            port:
              number: 4444
      # Other rules
1 This is where we enable basic HTTP authentication in Nginx 2 This is where we configure Nginx to use our credentials list 3 Any desired authentication realm name 4 This is where Nginx will set X-Moon-QuotaandAuthorizationheaders5 How to configure TLS is described here
Option 3. Openshift Ingress
Openshift Ingress often relies on HAProxy where basic HTTP authentication options are limited or unavailable. To overcome this limitation Moon provides a sidecar container called moon-basic-auth. This container is able to read users list from htpasswd file, validate user information from Authorization header and send correct X-Moon-Quota to Moon.
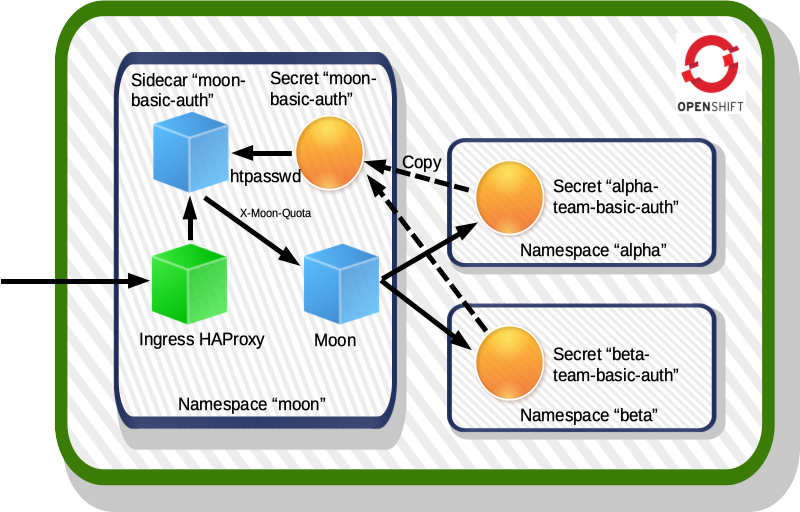
Configuring users for Openshift is done with Helm chart in exactly the same way as Nginx Ingress. The only difference is that you have to add openshift: true parameter to values.yaml as follows:
-
Create a
values.yamlfile:ingress: host: moon.example.com openshift: true # This enables sidecar for Openshift quota: moon: null alpha-team: namespace: alpha beta-team: namespace: beta password: beta-team-password -
Apply Helm chart:
$ helm upgrade --install -f values.yaml -n moon moon aerokube/moon2
$ helm upgrade --install -f values.yaml --set-file ingress.tlsCert=server.crt --set-file ingress.tlsKey=server.key -n moon moon aerokube/moon2 # The same with TLS encryption
Option 4. Custom Ingress
Our Helm chart allows to provide custom Ingress configuration using customIngress Helm parameter. When using custom Ingress, our Helm chart always starts a sidecar container called moon-basic-auth similarly to Openshift section. That means that authentication is handled inside Moon pod and even trying to access Moon using Kubernetes service directly will require authentication. For example to configure an ALB Ingress in AWS:
-
Create a
values.yamlfile:customIngress: enabled: true annotations: external-dns.alpha.kubernetes.io/hostname: moon.example.com alb.ingress.kubernetes.io/group.name: moon alb.ingress.kubernetes.io/scheme: internet-facing alb.ingress.kubernetes.io/target-type: ip ingressClassName: alb host: moon.example.com paths: - path: /api port: 9090 - path: /cypress port: 4444 - path: /playwright port: 4444 - path: /devtools port: 4444 - path: /metrics port: 4444 - path: /wd/hub/session port: 4444 - path: /ui port: 9090 - path: / port: 8080 quota: moon: null alpha-team: namespace: alpha beta-team: namespace: beta password: beta-team-password -
Apply Helm chart:
$ helm upgrade --install -f values.yaml -n moon moon aerokube/moon2
$ helm upgrade --install -f values.yaml --set-file ingress.tlsCert=server.crt --set-file ingress.tlsKey=server.key -n moon moon aerokube/moon2 # The same with TLS encryption
OpenID Connect Support
Moon supports integration with OpenID Connect implementations. OpenID Connect is an OAuth-based technology adding authentication information (OAuth only provides authorization capabilities). Existing OpenID Connect implementations allow to easily delegate authentication and authorization to third-party providers:
-
Popular OAuth cloud providers: Github, Google, Microsoft, Amazon Web Services, LinkedIn, Facebook, Okta and so on;
-
Popular corporate directory information services: OpenLDAP, Active Directory and other LDAP protocol implementations.
Concrete list of supported third-party providers depends on OpenID Connect implementation you are using. Exact settings of how to interact with selected third-party provider are usually configured in OpenID Connect implementation settings.
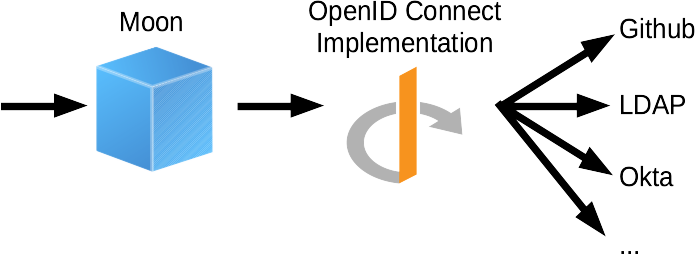
As you know, Moon is an HTTP API allowing to do browser automation from the code and a user web-interface helping to debug what’s happening in running browsers. Access to every of these two components is configured differently:
-
Access to Moon user interface can be protected using a third-party authentication reverse proxy like OAuth2 Proxy.
-
Access to Moon HTTP API is protected by another sidecar daemon called
moon-authwhich is a part of Moon distribution. The main reason for creating a separate daemon is that web-interfaces are usually storing authentication information in cookies and only browsers can process them. Programs doing browser automation via Moon HTTP API are never passing authentication information in cookies, somoon-authdaemon converts credentials coming from such programs to OpenID Connect format.
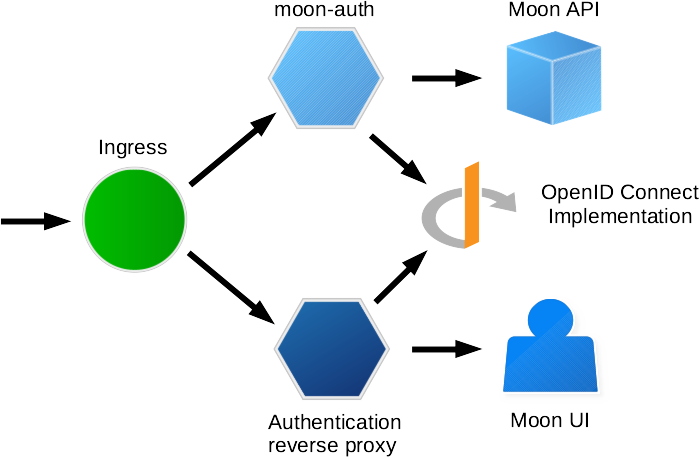
3.2.2. Quotas
As you already know Moon is a multi-user application. For every user you need to create one quota. For example for user alice you should create a quota named alice and so on. When only one quota is available - no authentication is required.
|
The main configuration object in Moon is called quota. This object contains all configuration specific to one Moon user. To list available quotas:
$ kubectl get quotas -n moon
NAME   NAMESPACE   CONFIG    BROWSERS   DEVICES   AGE
moon   moon        default   default    default   13h
As you can see every quota is a native Kubernetes object containing the following information:
-
Namespace. Kubernetes namespace name where Moon starts browsers. By default, this is the same namespace where Moon is running. More details on what you can do with namespaces is described here.
-
Config. Name of Moon configuration object allowing to adjust resources consumption for Moon system images, user and group identifiers and other features.
-
Browsers. Name of Moon browsers set to use for this quota.
-
Devices. Names of Moon devices set to use for this quota.
Using object names instead of their contents allows to easily reuse the same browsers set or devices set for different quotas. To view the same list in YAML format:
$ kubectl get quotas -n moon -o yaml
apiVersion: v1
items:
- apiVersion: moon.aerokube.com/v1
  kind: Quota
  metadata:
    name: moon                    (1)
    namespace: moon
    # Other Kubernetes metadata
  spec:
    browsers: default             (2)
    config: default               (3)
    devices: default              (4)
    namespace: moon               (5)
kind: List
metadata:
# List metadata| 1 | Quota name |
| 2 | Name of browsers set to use for this quota |
| 3 | Name of configuration object to use for this quota |
| 4 | Name of devices set to use for this quota |
| 5 | Namespace where Moon starts browsers |
To edit a quota object:
$ kubectl edit quota.moon moon -n moon # Do modifications in text editor, save and exit
$ kubectl edit team moon -n moon # An alias if you don't want to use fully qualified name
We are using quota.moon instead of just quota because in Kubernetes by default quota corresponds to ResourceQuota object.
|
3.2.3. Configuration Object
Configuration object stores various configuration options: computing resources being assigned to system Moon images, group and user identifiers to run browser pods and so on. This object corresponds to service.json configuration file in Moon 1.x. To list available configuration objects:
$ kubectl get configs -n moon
NAME      AGE
default   2d22h
To view the same list in YAML format:
$ kubectl get configs -n moon -o yaml
apiVersion: v1
items:
- apiVersion: moon.aerokube.com/v1
  kind: Config
  metadata:
    name: default                             (1)
    namespace: moon
    # Other Kubernetes metadata
  spec:
    additionalTrustedCAs: |                   (2)
      -----BEGIN CERTIFICATE-----
      ...
    containers:                               (3)
      browser:                                (4)
        resources:                            (5)
          limits:                             (6)
            cpu: "1"
            memory: 2Gi
          requests:                           (7)
            cpu: 500m
            memory: 2Gi
      ca-certs:                               (8)
        repository: aerokube/ca-certs         (9)
        version: 2.0.0                        (10)
        resources:                            (11)
          limits:                             (12)
            cpu: 250m
            memory: 64Mi
          requests:                           (13)
            cpu: 100m
            memory: 64Mi
        securityContext:                      (14)
          # Security context definition goes here
      defender:                               (15)
        # The same fields as for ca-certs
      proxy:                                  (16)
        # The same fields as for ca-certs
      video-recorder:                         (17)
        # The same fields as for ca-certs
      vnc-server:                             (18)
        # The same fields as for ca-certs
      x-server:                               (19)
        # The same fields as for ca-certs
    group:                                    (20)
      id: 4096                                (21)
      name: user                              (22)
    serviceAccountName: default               (23)
    sessionTimeout: 5m                        (24)
    storage:                                  (25)
      accessKey: ""
      bucket: ""
      filename: ""
      endpoint: ""
      noProxy: ""
      httpProxy: ""
      httpsProxy: ""
      pattern: ""
      secretKey: ""
      secretRef:
        accessKey: RootUser
        name: minio
        secretKey: RootPass
    user:                                     (26)
      id: 4096                                (27)
      name: user                              (28)
kind: List
metadata:
# List metadata| 1 | Configuration object name |
| 2 | Additional root certification authorities to be used (needed to work with self-signed TLS certificates). Not shown when empty. |
| 3 | Service containers (ca-certs, defender, proxy, video-recorder, vnc-server, x-server) configuration |
| 4 | browser container configuration |
| 5 | Computing resources assigned to container |
| 6 | CPU and memory limits assigned to container |
| 7 | CPU and memory requests assigned to container |
| 8 | ca-certs container configuration |
| 9 | Container image repository |
| 10 | Container image version. Not shown when empty. |
| 11 | Computing resources assigned to container |
| 12 | CPU and memory limits assigned to container |
| 13 | CPU and memory requests assigned to container |
| 14 | Security context definition for container |
| 15 | defender container configuration |
| 16 | proxy container configuration |
| 17 | video-recorder container configuration |
| 18 | vnc-server container configuration |
| 19 | x-server container configuration |
| 20 | System group used to start containers |
| 21 | System group numeric identifier (gid) |
| 22 | System group name |
| 23 | Kubernetes service account name to use |
| 24 | Default Selenium session timeout |
| 25 | S3 storage settings (used to save recorded videos) |
| 26 | System user used to start containers |
| 27 | System user numeric identifier (uid) |
| 28 | System username |
To edit a configuration object:
$ kubectl edit config default -n moon # Do modifications in text editor, save and exit3.2.4. Browsers Set
The browsers set stores browsers startup configuration. This object corresponds to browsers.json file in Moon 1.x. To list available browser sets:
$ kubectl get browsersets -n moon
NAME      AGE
default   2d23h
To view the same list in YAML format:
$ kubectl get browsersets -n moon -o yaml
apiVersion: v1
items:
- apiVersion: moon.aerokube.com/v1
  kind: BrowserSet
  metadata:
    name: default                                       (1)
    namespace: moon
    # Other Kubernetes metadata
  spec:
    cypress:                                            (2)
      chrome:                                           (3)
        repository: quay.io/browsers/cypress-chrome     (4)
      chromium:                                         (5)
        # The same fields as for chrome
      edge:                                             (6)
        # The same fields as for chrome
      electron:                                         (7)
        # The same fields as for chrome
      firefox:                                          (8)
        # The same fields as for chrome
    devtools:                                           (9)
      chrome:
        # The same fields as for cypress
    playwright:                                         (10)
      chrome:
        # The same fields as for cypress
      # Other supported browser types
    selenium:                                           (11)
      MicrosoftEdge:
        repository: quay.io/browser/microsoft-edge-beta
      chrome:
        repository: quay.io/browser/google-chrome-stable
      firefox:
        repository: quay.io/browser/firefox-mozilla-build
kind: List
metadata:
# List metadata| 1 | Browser set name |
| 2 | Cypress browsers configuration |
| 3 | Cypress Chrome browser configuration |
| 4 | Images repository to search for Cypress Chrome browser images |
| 5 | Cypress Chromium browser configuration |
| 6 | Cypress Microsoft Edge browser configuration |
| 7 | Cypress Electron browser configuration |
| 8 | Cypress Firefox browser configuration |
| 9 | Chrome Developer Tools browsers configuration |
| 10 | Playwright browsers configuration |
| 11 | Selenium browsers configuration |
To edit a browser set object:
$ kubectl edit browserset default -n moon # Do modifications in text editor, save and exitIf you were previously using Moon 1.x, you could notice that browsers set in Moon 2.x is slightly different compared to browsers.json from Moon 1.x. This is how a typical browsers.json file looks like:
browsers.json file looks like{
"chrome": {
"default": "97.0",
"versions": {
"97.0": {
"image": "quay.io/browsers/chrome:97.0",
"port": "4444"
}
}
}
}For every browser type and version you had to provide an exact browser image (e.g. browsers/chrome:97.0) and this file contained configuration only for Selenium browsers. The main problem with this approach is that it requires a manual update from Moon cluster administrator every time a new browser image appears. Container images for different versions of the same browser are usually stored in the same repository with different tags, e.g.:
quay.io/browser/google-chrome-stable:95.0 <==> Chrome 95.0
quay.io/browser/google-chrome-stable:96.0 <==> Chrome 96.0
quay.io/browser/google-chrome-stable:97.0 <==> Chrome 97.0
In Moon 2.x instead of copy-pasting the same image specification you only need to provide repository name in browsers set object:
selenium:
  chrome:
    repository: quay.io/browser/google-chrome-stable
This new configuration format means that all images for chrome browser used in Selenium tests will be downloaded from quay.io/browser/google-chrome-stable repository. Concrete image tag is determined when you request to start a new browser. For example, you pass the following Selenium capabilities:
browserName = chrome
browserVersion = 96.0
In that case Moon will use quay.io/browser/google-chrome-stable:96.0 image. Similarly, in Cypress, Playwright and Chrome Developer Tools you are using URL path and parameters to pass the same information.
Browser Versions
Although, not enabled by default, in Moon 2.x it is still possible to limit allowed browser versions:
selenium:
  chrome:
    repository: quay.io/browser/google-chrome-stable
    versions: ["96.0", "97.0"]            (1)
    default: "96.0"                       (2)
    port: 4444                            (3)
path: "/" (4)| 1 | Allowed browser versions list |
| 2 | Default browser version |
| 3 | Port inside browser container to send requests to (default is 4444) |
| 4 | Base API path to send requests to |
When versions list is specified, Moon will only allow to start browser versions from this list. By default, if no version is provided by the user, the first available version is taken. You easily override default version using default field. When versions and default fields are omitted, default version is latest.
Computing Resources
Default computing resources assigned to every browser are configured in configuration object. For every browser type you can easily override these defaults as follows:
selenium:
  chrome:
    repository: quay.io/browser/google-chrome-stable
    resources:                            (1)
      limits:                             (2)
        cpu: "1.0"                        (3)
        memory: "1Gi"                     (4)
      requests:                           (5)
        cpu: "1.0"                        (6)
memory: "1Gi" (7)| 1 | Computing resources section |
| 2 | Limits section (maximum allowed computing resources) |
| 3 | CPU limit |
| 4 | Memory limit |
| 5 | Request section |
| 6 | CPU request |
| 7 | Memory request |
Environment Variables
In some situations you may need to set environment variables to browser pods. For example this may be needed to set LANG or TZ environment variables being used by some browsers to detect preferred language and time zone respectively. To set an arbitrary environment variable - use regular Kubernetes syntax:
selenium:
  chrome:
    repository: quay.io/browser/google-chrome-stable
    env:                                (1)
      - name: TZ                        (2)
        value: "Europe/Paris"
      - name: LANG
value: "fr_FR.UTF-8"| 1 | Environment variables section |
| 2 | Concrete environment variable |
Advanced features like loading environment variables from pod fields, ConfigMap or Secret:
selenium:
  chrome:
    repository: quay.io/browser/google-chrome-stable
    env:
        - name: MY_NODE_NAME
          valueFrom:
            fieldRef:
              fieldPath: spec.nodeName # Pod spec field value
        - name: SECRET_USERNAME
          valueFrom:
            secretKeyRef:
              name: some-secret # Secret name
              key: username # Key name
        - name: MEM_LIMIT
          valueFrom:
            resourceFieldRef:
              containerName: some-container # Container name
              resource: limits.memory # Resource parameter
              divisor: 1Mi
        - name: SOME_KEY
          valueFrom:
            configMapKeyRef:
              name: some-map # ConfigMap name
              key: some-key # Key name
Custom Annotations
| Moon is using exactly the same annotations YAML format as Kubernetes itself. |
In some cases you may need to add custom Kubernetes annotations to started browser pods. If you need to add the same annotations to all browser types:
apiVersion: moon.aerokube.com/v1
  kind: BrowserSet
  metadata:
    name: default
    namespace: moon
    # Other Kubernetes metadata
  spec:
    annotations:                          (1)
      key1: "value1"                      (2)
key2: "value2"| 1 | Global annotations section |
| 2 | One or more annotations to be set |
To add annotations to some browser types - do the same for concrete browser type in browser set as follows:
selenium:
  chrome:
    repository: quay.io/browser/google-chrome-stable
    annotations:                          (1)
      key1: "value1"                      (2)
key2: "value2"| 1 | Annotations specification section |
| 2 | One or more annotations to be set |
Moon adds some annotations by default to browser pods and their names are reserved:
| Key | Meaning |
|---|---|
name |
Custom session label passed in |
Custom Labels
| Moon is using exactly the same labels YAML format as Kubernetes itself. |
In some cases you may need to add custom Kubernetes labels to started browser pods. If you need to add the same labels to all browser types:
apiVersion: moon.aerokube.com/v1
  kind: BrowserSet
  metadata:
    name: default
    namespace: moon
    # Other Kubernetes metadata
  spec:
    labels:                          (1)
      key1: "value1"                 (2)
key2: "value2"| 1 | Global labels section |
| 2 | One or more annotations to be set |
To add labels to some browser types - do the same in browser set as follows:
selenium:
  chrome:
    repository: quay.io/browser/google-chrome-stable
    labels:                               (1)
      key1: "value1"                      (2)
key2: "value2"| 1 | Labels specification section |
| 2 | One or more labels to be set |
Moon adds some labels by default to browser pods and their names are reserved:
| Key | Meaning |
|---|---|
app |
Stores unique name for every pod |
browserName |
Stores browser name |
browserVersion |
Stores browser version |
enableVNC |
Stores whether VNC is enabled |
moon |
System label, always equal to |
quota |
Stores user quota name |
screenResolution |
Stores screen resolution requested by user |
Node Selectors
| Moon is using exactly the same node selector YAML format as Kubernetes pods YAML. |
Sometimes you may need to run browser pods on particular Kubernetes nodes (i.e. hardware hosts) only. Kubernetes allows to do this by specifying so-called node selectors. If you need to add the same node selector to all browser types:
apiVersion: moon.aerokube.com/v1
  kind: BrowserSet
  metadata:
    name: default
    namespace: moon
    # Other Kubernetes metadata
  spec:
    nodeSelector:                         (1)
      node-label-1: "label1-value"        (2)
node-label-2: "label2-value"| 1 | Node selector specification section |
| 2 | One or more Kubernetes node labels to match against |
To provide node selector to specific browser type:
selenium:
  chrome:
    repository: quay.io/browser/google-chrome-stable
    nodeSelector:                         (1)
      node-label-1: "label1-value"        (2)
node-label-2: "label2-value"| 1 | Node selector specification section |
| 2 | One or more Kubernetes node labels to match against |
Affinity
| Moon is using exactly the same affinity configuration YAML format as Kubernetes pods YAML. |
In addition to node selectors, you can also use all available node and pod affinity features available in Kubernetes. This allows you to have even more advanced pod scheduling settings like matching Kubernetes nodes against complex logical expressions, preventing some labeled pods to be running on the same node with another labeled pods and so on. If you need to add the same affinity setting to all browser types:
apiVersion: moon.aerokube.com/v1
  kind: BrowserSet
  metadata:
    name: default
    namespace: moon
    # Other Kubernetes metadata
  spec:
    affinity:                                            (1)
      nodeAffinity:
        requiredDuringSchedulingIgnoredDuringExecution:
          nodeSelectorTerms:
          - matchExpressions:
            - key: kubernetes.io/e2e-az-name
              operator: In
              values:
              - e2e-az1
- e2e-az2| 1 | Affinity specification section |
To provide affinity to specific browser type:
selenium:
  chrome:
    repository: quay.io/browser/google-chrome-stable
    affinity:                                           (1)
      nodeAffinity:
        requiredDuringSchedulingIgnoredDuringExecution:
          nodeSelectorTerms:
          - matchExpressions:
            - key: kubernetes.io/e2e-az-name
              operator: In
              values:
              - e2e-az1
- e2e-az2| 1 | Affinity specification section |
Tolerations
| Moon is using exactly the same tolerations configuration YAML format as Kubernetes pods YAML. |
In addition to node selector and affinity, Kubernetes has a concept of node taints. Taints allow nodes to repel some pods from being scheduled on them. If you wish to run browser pods on tainted nodes - you have to add tolerations, that is to say a number of conditions to match against tainted nodes.
If you need to add the same tolerations to all browser types:
apiVersion: moon.aerokube.com/v1
  kind: BrowserSet
  metadata:
    name: default
    namespace: moon
    # Other Kubernetes metadata
  spec:
    tolerations:            (1)
    - key: "key1"
      operator: "Equal"
      value: "value1"
effect: "NoSchedule"| 1 | Tolerations specification section |
To assign tolerations to specific browser type:
selenium:
  chrome:
    repository: quay.io/browser/google-chrome-stable
    tolerations:                            (1)
    - key: "key1"
      operator: "Equal"
      value: "value1"
effect: "NoSchedule"| 1 | Tolerations specification section |
Networking
Some scenarios require flexible networking configuration. For example you may need to override used DNS server or /etc/hosts entries. This can be easily done as follows:
selenium:
  chrome:
    repository: quay.io/browser/google-chrome-stable
    dnsConfig:                            (1)
      nameservers:
        - 1.2.3.4
      searches:
        - ns1.svc.cluster-domain.example
        - my.dns.search.suffix
      options:
        - name: ndots
          value: "2"
        - name: edns0
    hostAliases:                          (2)
      - ip: "127.0.0.1"
        hostnames:
        - "foo.local"
        - "bar.local"
      - ip: "10.1.2.3"
        hostnames:
        - "foo.remote"
- "bar.remote"| 1 | DNS configuration section |
| 2 | Host aliases (/etc/hosts) configuration section |
dnsConfig and hostAliases fields have exactly the same syntax as their Kubernetes equivalents (pod DNS config and host aliases respectively).
Privileged Mode
In some cases like running Android emulators browser container should be run in privileged mode. This setting can be applied for each browser type as follows:
selenium:
  chrome:
    # For example Android emulators may require privileged mode
    repository: browsers/android
privileged: true (1)| 1 | Launch pod in privileged mode |
3.2.5. Devices Set
Moon loads information about available mobile devices for Mobile Emulation from devices set object. This object corresponds to devices.json file in Moon 1.x. To list available device sets:
$ kubectl get devicesets -n moon
NAME      AGE
default   2d23h
To view the same list in YAML format:
$ kubectl get devicesets -n moon -o yaml
apiVersion: v1
items:
- apiVersion: moon.aerokube.com/v1
  kind: DeviceSet
  metadata:
    name: default                                                                                 (1)
    namespace: moon
    # Other Kubernetes metadata
  spec:
    devices:                                                                                      (2)
      Apple iPhone 11:                                                                            (3)
        height: 896                                                                               (4)
        pixelRatio: 2                                                                             (5)
        printVersion: true                                                                        (6)
        userAgent: user-agent-string-for-chrome-%s                                                (7)
        width: 414                                                                                (8)
      # Other devices
kind: List
metadata:
# List metadata| 1 | Device set name |
| 2 | Devices list |
| 3 | Concrete device definition |
| 4 | Device screen height |
| 5 | Device pixel ratio |
| 6 | Whether to substitute Chrome version to user agent string (%s placeholder is replaced by Chrome version) |
| 7 | Device user agent |
| 8 | Device screen width |
To edit a device set object:
$ kubectl edit deviceset default -n moon # Do modifications in text editor, save and exit3.3. Video Recording
|
Video recording allows you to record the video of browser screen with your test scenario running in it. Recorded video can be then viewed in browser, video player or e.g. attached to test execution report. In Kubernetes or Openshift browsers are being run on a random network host and in case of auto-scaling enabled, these hosts periodically appear and disappear. So recorded videos should be saved to persistent storage before deleting browser pod. When requested Moon automatically sends recorded to video S3-compatible storage. Such type of storage is supported by AWS, Google Cloud, Microsoft Azure, Digital Ocean and many other cloud providers. To deploy a private S3-compatible storage you can use Minio.
To enable video recording you need to:
-
Configure S3 storage in Moon settings.
-
Request to record a video during test run.
3.3.1. Enabling S3 Storage
-
Create an S3 bucket. In this example bucket name is
moon-test. You can create an S3-compatible bucket in the majority of public cloud platforms. How to configure Moon with these platforms in shown in the table below:Table 12. S3 settings for popular cloud platforms Platform Name Service Name Endpoint Signature Version AWS
AWS S3
Depends on region, e.g.
https://s3.us-east-2.amazonaws.com. See AWS documentation for detailed list of endpoints.S3v4
DigitalOcean
DigitalOcean Spaces
Depends on region, e.g.
https://nyc3.digitaloceanspaces.com. See documentation for more details.S3v4
Google Cloud
Google Cloud Storage
S3v2
Microsoft Azure
Azure Blob Storage
No built-in S3 support. Need to deploy additional software like Minio.
S3v4
-
Access to S3 bucket can be provided either with a pair of static credentials (an access key and a secret key) or by adding cloud platform roles. This section shows how to configure static credentials. How to configure role-based access to S3 bucket is shown below.
-
Update storage settings in configuration object:
  apiVersion: moon.aerokube.com/v1
  kind: Config
  metadata:
    name: default
    namespace: moon
    # Other Kubernetes metadata
  spec:
    # Some fields before
    storage:
      accessKey: "AKIAXXXXXXXXXXXXXXXX" # Set if a pair of credentials is used
      bucket: "moon-test"
      filename: "" # Recorded video file name, e.g. myvideo.mp4
      endpoint: "https://s3.us-east-2.amazonaws.com"
      pattern: "" # See below
      secretKey: "okUa0XXXXXXXXXXXXXXXXXXXX" # Set if a pair of credentials is used
    # Other fields
3.3.2. Requesting to Record a Video
How to enable video recording depends on browser automation technology you are using:
Custom S3 Layout
By default, videos are uploaded to S3 bucket as follows:
\---my-bucket
    \---- <session-id>
        |---- video.mp4
Moon allows to organize any custom S3 keys layout using S3 key pattern with placeholders. A typical S3 key pattern looks like the following:
$quota/$browserName/$browserVersion/$sessionId
Here every placeholder such as $quota, $browserName, $browserVersion and so on will be replaced by corresponding information: user name, browser name, browser version. The resulting S3 key will be used as a directory to save video files. A list of supported placeholders is shown in the table below:
| Placeholder | Meaning |
|---|---|
$sessionId |
Replaced by Selenium session ID |
$browserName |
Replaced by Selenium browser name capability value |
$browserVersion |
Replaced by Selenium browser version capability value |
$date |
Replaced by current date, e.g. |
$quota |
Replaced by quota name (i.e. user name provided in Selenium URL) |
Default S3 key pattern is just $sessionId:
my-bucket/chrome-71-0-686efb96-eabe-4435-af31-21a33c8a4c8b/video.mp4
You can change S3 key pattern in configuration object as follows:
  apiVersion: moon.aerokube.com/v1
  kind: Config
  metadata:
    name: default
    namespace: moon
    # Other Kubernetes metadata
  spec:
    # Some fields before
    storage:
      # Other S3 storage settings
      pattern: "$quota/$browserName/$browserVersion/$sessionId"
    # Other fields
To define an S3 key pattern for every browser session independently - use pattern capability described in Moon-specific Capabilities section.
Getting S3 credentials from Kubernetes secret
|
In some cases you may want to load S3 credentials from Kubernetes secret instead of setting them as plain text in configuration object:
-
Create a Kubernetes secret in the namespace for respective quota:
An example Kubernetes secret with S3 credentials$ cat secret.yaml --- apiVersion: v1 kind: Secret metadata: name: credentials stringData: RootUser: "AKIAXXXXXXXXXXXXXXXX" RootPass: "okUa0XXXXXXXXXXXXXXXXXXXX" $ kubectl create -n moon -f secret.yaml secret/minio created -
Add
secretReffield in configuration object as follows:Loading S3 credentials from Kubernetes secretapiVersion: moon.aerokube.com/v1 kind: Config metadata: name: default namespace: moon # Other Kubernetes metadata spec: # Some fields before storage: # Other S3 storage settings secretRef: accessKey: RootUser # Name of the secret field with access key name: credentials # Secret name from previous step secretKey: RootPass # Name of the secret field with secret key # Other fields
Role-based Access to S3
Some teams prefer using cloud platform roles for giving access to S3 storage instead of a pair of static credentials. In this section we are showing how to deliver role-based access to S3 bucket in AWS cloud. To do this:
Option 1. Use kube2iam and Kubernetes annotations.
-
Install kube2iam.
-
Create an IAM role to access S3 bucket using the following CloudFormation template:
#jinja2:trim_blocks: False #jinja2:lstrip_blocks: False {% set var = config.jinja_parameters %} AWSTemplateFormatVersion: '2010-09-09' Description: Contains infra components for Aerokube Moon Parameters: TargetBucket: Description: Target bucket for IAM permissions Type: String Resources: PodRole: Type: AWS::IAM::Role Properties: RoleName: aerokube-moon AssumeRolePolicyDocument: Version: "2012-10-17" Statement: - Effect: Allow Action: sts:AssumeRole Principal: Service: ec2.amazonaws.com - Effect: Allow Action: sts:AssumeRole Principal: AWS: !Sub arn:aws:iam::${AWS::AccountId}:role/EKSInstanceRole Policies: - PolicyName: aerokube-moon PolicyDocument: Statement: - Action: - s3:List* - s3:Get* - s3:Put* Effect: "Allow" Resource: - !Sub "arn:aws:s3:::${TargetBucket}/*" - !Sub "arn:aws:s3:::${TargetBucket}" -
Annotate Moon namespace with the following annotation:
annotations: iam.amazonaws.com/allowed-roles: | ["aerokube-moon"] -
Add an annotation to browser pods in browsers set:
apiVersion: moon.aerokube.com/v1
kind: BrowserSet
metadata:
  name: default
  namespace: moon
  # Other Kubernetes metadata
spec:
  annotations:
    iam.amazonaws.com/role: "aerokube-moon"
  # Other fields
Option 2. Add IAM role to Moon service account.
-
Configure an IAM role for EKS service account AWS documentation.
-
Configure Moon to use this service account.
Uploading Videos Through Proxy
|
This feature is available since Moon 2.6.0. |
In some restricted environments videos should be uploaded to S3 bucket using a proxy server. To configure this - update configuration object as follows:
  apiVersion: moon.aerokube.com/v1
  kind: Config
  metadata:
    name: default
    namespace: moon
    # Other Kubernetes metadata
  spec:
    # Some fields before
    storage:
      # Other S3 storage settings
      noProxy: "*.example.com" # Don't use proxy for these hosts
      httpProxy: "proxy.example.com:3128" # Proxy host and port for HTTP traffic
      httpsProxy: "proxy.example.com:3128" # Proxy host and port for HTTPS traffic
    # Other fields
Syntax of these fields correspond to NO_PROXY, HTTP_PROXY and HTTPS_PROXY environment variables.
3.4. Automatically Updating Browser Versions
| This feature is available since Moon 2.3.0. |
Moon 2.x is choosing browser images by naming convention. For example, when you request a Selenium browser chrome 100.0 it will by default try to use quay.io/browser/google-chrome-stable:100.0 image. Exact repository used to fetch images can be configured in browsers set object. However, for Moon UI a list of available browser versions is limited and should be configured explicitly in the same browsers set object. Starting from Moon 2.3.0 we provide an automated solution to maintain the list of browser versions in Moon UI always up to date. This solution is called browser-ops and is distributed as a separate Kubernetes job that periodically checks for new browser versions in images repository and updates browsers set accordingly.
3.4.1. Installation
| Helm chart source code is available here. |
To activate this solution you need to install one more Helm chart:
-
Add Aerokube charts repository if you don’t have it already:
$ helm repo add aerokube https://charts.aerokube.com/ $ helm repo update -
Install
browser-opschart:$ helm upgrade --install -n moon browser-ops aerokube/browser-ops -
Run update manually for the first time (otherwise you will have to wait for the time schedule configured in chart values):
$ kubectl create job -n moon --from=cronjob/browser-ops update-browsers
job.batch/update-browsers created

$ kubectl get jobs -n moon
NAME              COMPLETIONS   DURATION   AGE
update-browsers   0/1           4s         4s
3.4.2. Configuration Options
Like for any other Helm chart, browser-ops configuration options are stored in values.yaml file and applied like this:
$ helm upgrade --install -f values.yaml -n moon browser-ops aerokube/browser-ops-
By default, browser versions will be updated every night. To change version update schedule:
schedule: "0 */2 * * *" # Run every two hours -
By default,
browser-opswill configure Moon to use the latest available browser version. You can easily change this behavior to configure all available browser versions or fixed number of the latest available browser versions:browserImageVersions: all # Use all available browser versionsbrowserImageVersions: 5 # Use 5 available browser versions -
By default,
browser-opswill use long browser versions like102.0.1245.30instead of102.0. To use short versions:browserImageTagFormat: shortWhen using short browser versions the latest available browser version will not be present in the list. This is because for one major browser version there could be several minor updates. Such behavior allows to not cache a minor browser version update that can be later updated one more time by browser developers. -
By default,
browser-opsonly updates browsers set object nameddefault. If you have several browsers set objects, provide all required names of such objects:browsersets: - default - alpha - beta
3.5. Using Private Container Registry
By default, Moon images (aerokube/defender, aerokube/logger and so on) are downloaded from public container images registry. If in your environment due to security restrictions container images can only be downloaded from private registry (e.g. my-registry.example.com) you need to configure Moon to work with this registry. To do this:
-
Configure Kubernetes authentication to your private registry:
$ kubectl create secret docker-registry my-registry.example.com --docker-server=my-registry.example.com --docker-username=some-user --docker-password=registry-password --docker-email=some-user@example.com -n moon
$ kubectl patch serviceaccount moon -p '{"imagePullSecrets": [{"name": "my-registry.example.com"}]}' -n moon # Use correct service account name here
In case of Openshift the following commands will work:
$ oc create secret docker-registry my-registry.example.com --docker-server=my-registry.example.com --docker-username=some-user --docker-password=registry-password --docker-email=some-user@example.com -n moon
$ oc secrets link moon my-registry.example.com --for=pull -n moon
-
Copy all desired browser images to your registry:
quay.io/browser/google-chrome-stable:96.0 => my-registry.example.com/browsers/chrome:96.0
-
Update browsers set to use new browser images repository:
Browsers Set with Private Container RepositoryapiVersion: moon.aerokube.com/v1 kind: BrowserSet metadata: name: default namespace: moon # Other Kubernetes metadata spec: # Other tools come here selenium: chrome: repository: my-registry.example.com/browsers/chrome # Other browser types come here -
Copy desired version of the Moon service images to your registry:
aerokube/ca-certs:2.0.0 => my-registry.example.com/aerokube/ca-certs:2.0.0 aerokube/defender:2.0.0 => my-registry.example.com/aerokube/defender:2.0.0 aerokube/proxy:2.0.0 => my-registry.example.com/aerokube/proxy:2.0.0 aerokube/vnc-server:2.0.0 => my-registry.example.com/aerokube/vnc-server:2.0.0 aerokube/video-recorder:2.0.0 => my-registry.example.com/aerokube/video-recorder:2.0.0 aerokube/x-server:2.0.0 => my-registry.example.com/aerokube/vnc-server:2.0.0 -
Override Moon service images, update configuration object with the following contents:
apiVersion: moon.aerokube.com/v1 kind: Config metadata: name: default namespace: moon # Other Kubernetes metadata spec: containers: ca-certs: repository: my-registry.example.com/aerokube/ca-certs version: 2.0.0 # You can omit this field and then Moon will use its own image tag (recommended approach) defender: repository: my-registry.example.com/aerokube/defender proxy: repository: my-registry.example.com/aerokube/proxy vnc-server: repository: my-registry.example.com/aerokube/vnc-server x-server: repository: my-registry.example.com/aerokube/x-server video-recorder: repository: my-registry.example.com/aerokube/video-recorder -
Copy desired version of Moon main images to your registry:
aerokube/moon:2.0.0 => my-registry.example.com/aerokube/moon:2.0.0 aerokube/moon-conf:2.0.0 => my-registry.example.com/aerokube/moon-conf:2.0.0 aerokube/moon-ui:2.0.0 => my-registry.example.com/aerokube/moon-ui:2.0.0 -
Use new main Moon images from the previous step in Helm chart to start Moon and Moon UI.
3.6. Adjusting Timeouts
3.6.1. Adjusting Moon Timeouts
Sometimes things go wrong: user can unexpectedly disconnect or browser session starts longer than needed. This can lead to overall cluster degradation because of broken browser pods occupying all available hardware. To prevent such cases Moon automatically detects and closes idle browser sessions. A session is considered idle when the delay between separate HTTP requests corresponding to a running session is bigger than configured timeout. Idle timeout may need to be increased when tested application pages are loading too slowly. To view or change idle timeout setting - take a look at configuration object:
$ kubectl get configs -n moon -o yaml
apiVersion: v1
items:
- apiVersion: moon.aerokube.com/v1
  kind: Config
  metadata:
    name: default
    namespace: moon
    # Other Kubernetes metadata
  spec:
    # Other fields
    # Use values like 60s or 1m10s here
sessionTimeout: 5m (1)| 1 | Idle session timeout setting |
Several rarely needed Moon command-line flags are responsible for advanced timeout settings:
| Flag | Default Value | Meaning | Notes |
|---|---|---|---|
-delete-timeout |
10 minutes |
Maximum time to delete Kubernetes resources created for browser session. |
Moon deletes resources using Kubernetes API. When this timeout expires - Moon stops respective request and gives up deleting resources. |
-session-attempt-timeout |
30 minutes |
Maximum time to start browser pod. |
This time includes Kubernetes scheduling time and browser image download duration. You load balancer proxy timeout should be bigger than this setting. |
3.6.2. Adjusting Other Timeouts
Not only Moon timeout settings can cause your tests to break. A typical Moon installation looks like the following:
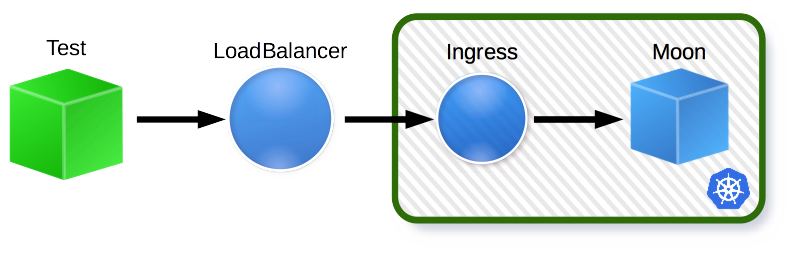
In addition to Moon timeouts other possible sources of timeouts exist:
-
Client-side Timeout. Every Selenium library is internally using an HTTP client having default request timeout settings. If you are frequently seeing
client disconnectedmessages (meaning that client disconnected before request handling completed) in Moon log - this could be a sign to increase HTTP client timeouts in your code. -
Load Balancer Timeout. Usually Moon is running behind load balancer (
LoadBalancer,IngressorRouter), and it also has a default request proxy timeout. A frequent value is60 seconds, so if you are often seeing test fails with502 Bad Gatewayor504 Gateway Timeouterrors - this could be a sign to increase load balancer timeout. How to do this depends on your cloud platform and load balancer type being used. So refer to their documentation for more details. An example of doing this for AWS cloud is shown in Connection was closed unexpectedly section. -
Cluster Capacity Reached. If you are seeing a lot of
unexpected statusmessages in the log that can signalize that you used all available computing resources (CPUs and memory) assigned to Moon namespace. -
Cluster Fragmentation. Similarly to the previous one, in some cases you can have sufficient number of cores and not all browsers are exhausted. However, sometimes for example you can have 4 CPUs available distributed among 4 Kubernetes nodes (1 available CPU per node) and a new browser pod requiring at least 2 CPUs to start (all pod containers always run on the same node). In that case although total number of available CPUs is sufficient to start a pod, there is no node where pod will be able to start. If you are seeing too many browser pods in
Pendingstate - check withkubectlcommand why these pods are not starting.
3.7. Adjusting Resources Consumption
3.7.1. Browser Resources Consumption
Moon has reasonable defaults for resources consumed by every browser pod. Sometimes you may need to override these settings. To override resource settings globally for every browser image - use configuration object:
$ kubectl get configs -n moon -o yaml
apiVersion: v1
items:
- apiVersion: moon.aerokube.com/v1
  kind: Config
  metadata:
    name: default
    namespace: moon
    # Other Kubernetes metadata
  spec:
    containers:
      browser:
        resources:        (1)
          limits:
            cpu: "1"
            memory: 2Gi
# Other fields| 1 | Browser container resources configuration |
To update resource settings - simply edit configuration object, save and exit:
$ kubectl edit config default -n moon # Update computing resources configuration, save and exitYou can also override the same values for every browser type in browsers set. An example snippet can be found here.
3.7.2. Service Images Resources Consumption
To check service images resources requirements - simply show configuration object for your quota in YAML format:
$ kubectl get configs -n moon -o yaml
apiVersion: v1
items:
- apiVersion: moon.aerokube.com/v1
  kind: Config
  metadata:
    name: default
    namespace: moon
    # Other Kubernetes metadata
  spec:
    containers:
      browser:
        # Some fields
      ca-certs:
        # More fields go here
        resources:
          limits:
            cpu: 250m
            memory: 64Mi
          requests:
            cpu: 100m
            memory: 64Mi
      defender:
        # The same fields as for ca-certs
      video-recorder:
        # The same fields as for ca-certs
      vnc-server:
        # The same fields as for ca-certs
      x-server:
        # The same fields as for ca-certs
      # Other fields
To adjust CPU and memory consumption for each service image - simply update configuration object accordingly.
3.7.3. Pods Quality of Service
Browser automation stability and speed highly depends on how many computing resources are actually available to browser pods. Kubernetes has so-called Quality of Service (QoS) defining how many resources are assigned to pods being started. For stable browser automation we recommend always setting Guaranteed QoS class to Moon browser pods. To deliver this you have to make sure that requests and limits values for CPU and memory have equal values:
-
Moon by default sets
requestsequal tolimitsfor service images likedefender,loggerandvideoRecorder. But in recent releases you can override them independently if you wish. -
For browser containers you can override
requestsandlimitsindependently. Anyway we also recommend setting them to equal values. Only this way you will be sure that browsers are always getting the same computing resources. Otherwise, you may encounter randomly failing browser tests caused by insufficient computing resources assigned to some browser pods.
3.8. Using Additional Trusted TLS Certificates
In corporate networks tested environments are often using additional trusted TLS certificates. Such certificates are issued by a root certification authority not known to browsers. When trying to open an HTTPS web-page using such TLS certificate, your browser by default will refuse to do this saying that "Your connection is not private" or "This connection is untrusted". In Selenium tests you can use a standard capability (acceptInsecureCerts = true) to ignore such certificate errors but this will not work when your web-page is using Strict Transport Security.
In order to work properly with additional trusted TLS certificates, you have to add your root certification authority certificate to a list of trusted certificates:
-
Find root certificate for certification authority being used to secure your tested environment. Usually such certificates are being issued by IT security team or systems administrators and are publicly available in corporate network. For example your root certificate can look like this:
$ cat rootCA.crt
-----BEGIN CERTIFICATE-----
MIIGjzCCBHegAwIBAgIJAK1lW/5z8ZSoMA0GCSqGSIb3DQEBCwUAMIGLMQswCQYD
VQQGEwJFRTEQMA4GA1UECBMHRXN0b25pYTEQMA4GA1UEBxMHVGFsbGlubjEeMBwG
A1UEChQVQWVyb2t1YmUgU29mdHdhcmUgT8OcMRUwEwYDVQQDEwxhZXJva3ViZS5j
b20xITAfBgkqhkiG9w0BCQEWEmFkbWluQGFlcm9rdWJlLmNvbTAeFw0yMTAyMTcw
NjQ5NDJaFw0yMzEyMDgwNjQ5NDJaMIGLMQswCQYDVQQGEwJFRTEQMA4GA1UECBMH
RXN0b25pYTEQMA4GA1UEBxMHVGFsbGlubjEeMBwGA1UEChQVQWVyb2t1YmUgU29m
dHdhcmUgT8OcMRUwEwYDVQQDEwxhZXJva3ViZS5jb20xITAfBgkqhkiG9w0BCQEW
EmFkbWluQGFlcm9rdWJlLmNvbTCCAiIwDQYJKoZIhvcNAQEBBQADggIPADCCAgoC
ggIBAKdh54x9WZsSxIMfz1rFEHuJ8+3meUua0Q8cpgC/70F0G6X6BXOki0Cu7iET
6ETfirWuUdRKKGKXHLF8Fdv6WTqnLlDqgzy1Wp9DuPIgeJ+ztKZt+uJFkWjfQb9R
mn7Qs4vp/F9HTwqlTZl5jMQ+/nrcNAQeNEZ1H1AfZWAuSvrqp3rW33wl6IBZcqfD
VsMBknBKm/Zc8GpggY8NYxkfj7Jo2izwn/tV+DFgwF0pJkUrDZPPTiNW7q8Se2Vb
7tC6Iy9ZVgkH8hkrWrPzwW4zxz/d/Si7/cnn9A9+bF+pKrsHktnQ0ScDEAR5+52J
XAXkES/4pINpBcxvNUHGO6KXKH4rJVf3QvXXany0ugwVQ+QXirA6yOoY3XFgBxgU
P7Qd5pyQdVf/SwJ5Uk5Z9b2HXk8k/6jNxe1A6WiojTOnn1fD/VzOTn4xiobqNIpE
w5dUhlj/TiN+g3uGBH4BPo6IYHCmfsXFEcSZW75k7dRlZ3ZMI4k0utUVm3Y8B+TC
sj4WmwnXetFP2EMnRft7BnR13oLyzrFB8tkFafstcVoE6oR20pIBtAFxrSDWJ5dA
XdX2NGPNUCnd1RqJxu2SGA/xHHsyPT06iJeIZGUyRXmv6vBvyCkyeLtMEdq2Gzfi
MT0GtDkG5R+al/A+Ot3w3CMbMgUFrxvEhlxM1sEitclXJc4tAgMBAAGjgfMwgfAw
HQYDVR0OBBYEFBb9mCFAqV/JgmMxtwQ6UKzoLIQQMIHABgNVHSMEgbgwgbWAFBb9
mCFAqV/JgmMxtwQ6UKzoLIQQoYGRpIGOMIGLMQswCQYDVQQGEwJFRTEQMA4GA1UE
CBMHRXN0b25pYTEQMA4GA1UEBxMHVGFsbGlubjEeMBwGA1UEChQVQWVyb2t1YmUg
U29mdHdhcmUgT8OcMRUwEwYDVQQDEwxhZXJva3ViZS5jb20xITAfBgkqhkiG9w0B
CQEWEmFkbWluQGFlcm9rdWJlLmNvbYIJAK1lW/5z8ZSoMAwGA1UdEwQFMAMBAf8w
DQYJKoZIhvcNAQELBQADggIBAIUmJsxdrT8AN2yZqzI69qQKjLnDhuojdgM3XGL3
gJTldXR5OIMnw/na8WcIC3onHjgijUeEfslTIIHmNcqOd3hTfOq4Qq2/Qmpp+h1d
5dCzScrLFiDgjnzkX0VczOj/BtnZMgxx5x8YO80MMUWVEmVCk+i2bFVTypV9e4qw
1EJLmGTnKoo7l2jPHLUB5lL2LvSO4KHDhmWG5wtFg7/nd097yG5uBHda5ytbc6S8
CIS8IBJzd7TA4fr3qOhC298LMD96nJdccHqKYtlFvf9YZZ500nrA+pH6Kpo8PD67
8WiIW/CMtO0X9pxw+KRlmaDmCGGgRhvPyHoYqbX4svrca8uvErePtXIQILe/IISJ
TXLkiVsej8k3UDu77q/wX3ZdzknWakZyPj+CtYkkZL4vqkIDIFSUcXfynyDZNZEo
2d+npABzPB42+4xGZGGnFIsfuTMAgpbK8TAgPQNMIawfWTq2KhZ8MYHfPdkU3FBo
MaExr684sviAImqOotcoNQV2iMOKdwzA097jRBrfa43LhpdoWM0v7RVxB8s+kG0P
8nHOGmp6r6cIAk5hjHYAwQYiZjXuzvnFTtD9Ily63i+yVh8nRSY9NSLhpFpl4ezo
hn+savO4nm/HueAATnGR1iPlKnfXNVqQYdl+wwzqK1/3iHjzUUjyQkk0oTBk4Bez
ejbh
-----END CERTIFICATE-----
-
Add certificate data to configuration object:
apiVersion: moon.aerokube.com/v1
kind: Config
metadata:
    name: default
    namespace: moon
    # Other Kubernetes metadata
spec:
  additionalTrustedCAs: |
    -----BEGIN CERTIFICATE-----
    MIIGjzCCBHegAwIBAgIJAK1lW/5z8ZSoMA0GCSqGSIb3DQEBCwUAMIGLMQswCQYD
    VQQGEwJFRTEQMA4GA1UECBMHRXN0b25pYTEQMA4GA1UEBxMHVGFsbGlubjEeMBwG
    A1UEChQVQWVyb2t1YmUgU29mdHdhcmUgT8OcMRUwEwYDVQQDEwxhZXJva3ViZS5j
    ....
If you need to add several certificates - then add every certificate to the new line:
apiVersion: moon.aerokube.com/v1
kind: Config
metadata:
    name: default
    namespace: moon
    # Other Kubernetes metadata
spec:
  additionalTrustedCAs: |
    -----BEGIN CERTIFICATE-----
    MIIGjzCCBHegAwIBAgIJAK1lW/5z8ZSoMA0GCSqGSIb3DQEBCwUAMIGLMQswCQYD
    VQQGEwJFRTEQMA4GA1UECBMHRXN0b25pYTEQMA4GA1UEBxMHVGFsbGlubjEeMBwG
    A1UEChQVQWVyb2t1YmUgU29mdHdhcmUgT8OcMRUwEwYDVQQDEwxhZXJva3ViZS5j
    ...
    -----END CERTIFICATE-----
    -----BEGIN CERTIFICATE-----
    MIIDBjCCAe6gAwIBAgIBATANBgkqhkiG9w0BAQsFADAVMRMwEQYDVQQDEwptaW5p
    a3ViZUNBMB4XDTIyMDExMDEzMzgwNloXDTMyMDEwOTEzMzgwNlowFTETMBEGA1UE
    AxMKbWluaWt1YmVDQTCCASIwDQYJKoZIhvcNAQEBBQADggEPADCCAQoCggEBALpJ
    ...
    -----END CERTIFICATE-----
Added certificates are automatically applied to all browser types and uploading videos to S3 endpoints.
3.9. Multiple Namespaces Mode
This section has moved.
3.10. Advanced Settings
This section describes how to configure some advanced features sometimes required by Kubernetes cluster settings. Moon is using just the same keys and values that Kubernetes itself does for most of the settings below. This is how a typical Kubernetes pod looks like:
apiVersion: v1
kind: Pod
metadata:
  name: my-app
  annotations:
    key1: "value1"
    key2: "value2"
  labels:
    key1: "value1"
    key2: "value2"
spec:
  containers:
  - name: app
    image: my-company/my-app:1.0.0
    resources:
      requests:
        memory: "64Mi"
        cpu: "250m"
      limits:
        memory: "128Mi"
        cpu: "500m"
Now compare this with one of Moon objects:
apiVersion: moon.aerokube.com/v1
kind: BrowserSet
metadata:
  name: default
  namespace: moon
# Other Kubernetes metadata
spec:
  annotations:
    key1: "value1"
    key2: "value2"
  labels:
    key1: "value1"
    key2: "value2"
3.10.1. Adding Custom Kubernetes Annotations
This is configured globally or for concrete browser types in browsers set. How to do this is described here.
3.10.2. Adding Custom Kubernetes Labels
This is configured globally or for concrete browser types in browsers set. How to do this is described here. Also, you can override labels using labels capability.
3.10.3. Adding Network Policies
Network policies are dedicated Kubernetes objects allowing to control network firewall rules. Using them with Moon is straightforward:
-
Create a
NetworkPolicyobject. This is how it can look like:apiVersion: networking.k8s.io/v1 kind: NetworkPolicy metadata: name: my-network-policy namespace: moon spec: podSelector: matchLabels: # This rule will apply pods matching labels below role: browser ingress: - from: - podSelector: matchLabels: role: my-app ports: - protocol: TCP port: 6379 -
Use custom labels to add respective label to browser pods:
selenium:
  chrome:
    repository: quay.io/browser/google-chrome-stable
    labels:
      role: browser # Every Chrome pod will have this label set
3.10.4. Using Node Selectors
This is configured globally or for concrete browser types in browsers set. How to do this is described here.
3.10.5. Using Affinity
This is configured globally or for concrete browser types in browsers set. How to do this is described here.
3.10.6. Using Tolerations
This is configured globally or for concrete browser types in browsers set. How to do this is described here.
3.10.7. Running Browser Pods in Privileged Mode
This is configured for concrete browser types in browsers set. How to do this is described here.
3.10.8. Setting Custom User and Group Identifier to Browser Pods
In Moon 2.x this is configured for all browser pods in configuration object. If you need to use different user and group identifiers for different Moon users, simply create several configuration objects and attach them to respective quota objects. Default values are:
| Name | Value |
|---|---|
Default user id |
4096 |
Default user name |
user |
Default group id |
4096 |
Default group name |
user |
3.10.9. Setting Custom Service Account For Browser Pods
This is configured globally for all browser pods in configuration object.
$ kubectl get configs -n moon -o yaml
apiVersion: v1
items:
- apiVersion: moon.aerokube.com/v1
  kind: Config
  metadata:
    name: default
    namespace: moon
    # Other Kubernetes metadata
  spec:
    # Other fields
    serviceAccountName: my-account        (1)
# Other fields| 1 | Custom service account setting |
3.10.10. Setting Security Context For Browser Pods
This is configured separately for each Moon container in configuration object. YAML syntax is exactly the same as for Kubernetes pod containers.
$ kubectl get configs -n moon -o yaml
apiVersion: v1
items:
- apiVersion: moon.aerokube.com/v1
  kind: Config
  metadata:
    name: default
    namespace: moon
    # Other Kubernetes metadata
  spec:
    # Other fields
    containers:
      browser:
        # Other fields
        securityContext:                    (1)
          allowPrivilegeEscalation: false
          capabilities:
            drop:
            - ALL
          privileged: false
          runAsGroup: 4096
          runAsNonRoot: true
          runAsUser: 4096
          seccompProfile:
            type: RuntimeDefault
        # Other fields
      ca-certs:
        # The same fields as for browser
      defender:
        # The same fields as for ca-certs
      proxy:
        # The same fields as for ca-certs
      video-recorder:
        # The same fields as for ca-certs
      vnc-server:
        # The same fields as for ca-certs
      x-server:
# The same fields as for ca-certs| 1 | Security context definition |
3.11. Upgrading Moon Version
Moon versions are following semantic versioning scheme (MAJOR.MINOR.PATCH), e.g. 2.3.0, 2.5.3 and so on. Major version component means Moon generation (currently always equals to 2). Minor version component is changed when we add new important features. Patch version component is changed when release mainly contains minor improvements and bug fixes.
|
Moon main installation method is using Helm and a typical command allowing to do this is:
$ helm upgrade --install -n moon moon aerokube/moon2Usually to upgrade software version with Helm you do:
$ helm repo update # To fetch latest Helm chart information
$ helm upgrade --install -n moon moon aerokube/moon2 # Exactly the same command as for fresh installation
Commands above will work when upgrading Moon to the version where patch number changed (e.g. from 2.5.0 to 2.5.1, 2.5.2 and so on). However, if you are upgrading Moon to the version where minor component has changed (e.g. from 2.4.0 to 2.5.0), then upgrade procedure can be a bit more complex. This is because Moon 2 relies on so-called Kubernetes custom resources to store its configuration and from time to time we add new configuration fields to these resources. Currently, Helm never upgrades previously installed custom resource definitions, so you have to do this manually when upgrading to the new version with changed custom resource definitions:
$ helm repo update
$ helm delete moon -n moon # Completely uninstall previous version
$ kubectl delete crd $(kubectl get crd | grep moon.aerokube.com | awk '{print $1}') # Delete custom resource definitions from previous Moon version
$ helm upgrade --install -n moon moon aerokube/moon2 # Install new Moon version
We usually note about custom resource definitions change in release notes (like here). If you forget to upgrade custom resource definitions Moon can stop working with messages like this:
# During Helm upgrade command
unknown field "spec.containers.proxy"

# In Moon logs:
moon: no such config: "default"
config controller: config "default": add: validate containers.proxy: value is not set: using default
3.12. Monitoring
You can easily visualize browsers consumption and other Moon metrics with Prometheus and Grafana. One of the simplest ways of deploying Prometheus in Kubernetes is using Prometheus Operator.
3.12.1. Setup
-
Moon should be already running (e.g. in
moonnamespace). -
Deploy Prometheus and Grafana using Prometheus Operator (e.g. to
monitoringnamespace).An example installation command using Helm 3 is:
$ helm repo add prometheus-community https://prometheus-community.github.io/helm-charts
$ helm repo update
$ helm install kube-prometheus-stack prometheus-community/kube-prometheus-stack --create-namespace --namespace monitoring
-
Having a configured Prometheus instance you have two ways of getting metrics: using built-in Moon metrics and filtering browser pods by labels.
3.12.2. Built-in Moon metrics
Built-in Moon metrics are exposed on the standard /metrics HTTP API.
$ curl -s https://moon.example.com/metrics
# A lot of metrics come here
The following metrics are available:
| Name | Type | Labels | Meaning |
|---|---|---|---|
moon_browser_limit |
gauge |
- |
Maximum number of browser sessions allowed by installed license key |
moon_browser_running |
gauge |
- |
Total number of currently running browser sessions |
moon_browser_count |
gauge |
quota, browserName, browserVersion |
Browser consumption corresponding to exact browser name and version |
moon_browser_queued |
gauge |
- |
Total number of browser requests in queue |
moon_license_expire |
gauge |
- |
Moon license key expiration timestamp |
3.12.3. Filtering Browser Pods by Labels
Installing Prometheus with kube-prometheus-stack will also automatically install kube-state-metrics component. This component allows you to filter Kubernetes pods by labels, annotations, status, start time and so on. To fetch information about browser pods with some labels set, use the following Prometheus query:
kube_pod_labels{label_moon="browser", label_browserName="chrome", label_browserVersion="96.0"}
Full list of available expressions can be found here.
Moon can add custom labels to started browser pods (e.g. browser automation project name, tested feature name and so on). This can be done globally in using browsers set, Selenium capabilities and so on. For example, after having a label project="MyCoolProject" on browser pods, you can filter such pods like this:
kube_pod_labels{label_moon="browser", label_project="MyCoolProject", label_browserName="chrome"}
3.13. Log Files
Although Moon should just work out of the box, sometimes you may need the log output. Every Moon component is outputting logs to standard output (stdout), so you can use well-known kubectl commands to see the log. Everything related to browser sessions is being output by moon container:
$ kubectl logs -lapp=moon -c moon -n moon
To follow the logs while running the tests add -f flag:
$ kubectl logs -f -lapp=moon -c moon -n moon
You can also take a look at moon-conf and moon-ui logs as follows:
$ kubectl logs -f -lapp=moon -c moon-conf -n moon
$ kubectl logs -f -lapp=moon -c moon-ui -n moon
If you are encountering browser pods not being deleted - then take a look at defender container logs for every frozen browser pod:
$ kubectl logs chrome-73-0-ac15ffaa-e641-4c7f-a54c-f25b5be1f135 -c defender -n moon
Here chrome-73-0-ac15ffaa-e641-4c7f-a54c-f25b5be1f135 is the browser session ID equal to browser pod name.
3.14. CLI Flags
These flags should be specified in Kubernetes YAML files when starting the cluster.
3.14.1. Moon Container Flags
The following flags are supported:
-browser-limit value
    parallel browser sessions limit
-callback-url value
    moon callback url
-delete-timeout duration
    timeout to delete Kubernetes resources (default 10m0s)
-grace-period duration
    graceful shutdown period (default 5m0s)
-listen string
    host and port to listen to (default ":4444")
-moon-url value
    moon service url (default http://moon.moon:4444/wd/hub)
-session-attempt-timeout duration
    new session attempt timeout (default 30m0s)
-version
    show version and exit
3.14.2. Moon Auth Container Flags
The following flags are supported:
-ca-cert string
    ca certificate to verify discovery cert (optional)
-client-id string
    client id (required)
-client-secret string
    client secret (required)
-discovery-url value
    oidc discovery url (required)
-fail-login-timeout duration
    request timeout (default 30s)
-grace-period duration
    graceful shutdown period (default 30s)
-group value
    allowed user groups (optional)
-ignore-case
    ignore user groups case
-listen string
    address to bind (default ":4545")
-request-timeout duration
    request timeout (default 30s)
-upstream-url value
    upstream url (default http://127.0.0.1:4444/)
-version
    show version and exit
3.14.3. Moon Basic Auth Container Flags
The following flags are supported:
-f string
    htpasswd file path (default "/conf/auth")
-grace-period duration
    graceful shutdown period (default 30s)
-listen string
    address to bind (default ":4545")
-upstream-url value
    upstream url (default http://127.0.0.1:4444/)
4. Frequently Asked Questions
4.1. Where are Moon logs?
See Log Files section.
4.2. Where are recorded videos stored?
Moon automatically saves session logs and recorded video files to S3 compatible storage. If S3 storage is not configured - then video recording will not work.
4.3. How to update configuration of a running Moon cluster?
Just update respective custom resources (config, browserset, deviceset, quota, license) with standard Kubernetes commands (kubectl edit or kubectl replace). For example:
$ kubectl edit config default -n moon # Updating configuration object
$ kubectl edit browserset default -n moon # Updating Moon browsers set
$ kubectl edit deviceset users -n moon # Updating Moon devices set
$ kubectl edit quota default -n moon # Updating Moon quota
$ kubectl edit license moon # Updating Moon license key
These commands will open your preferred editor with respective data: do any desired modifications, save and exit. Changes are applied immediately.
4.4. Is it possible to configure Kubernetes service account for Moon?
Yes, Moon has serviceAccountName setting in configuration object.
4.5. Is it possible to assign custom firewall rules to browser pods?
Yes, using built-in Kubernetes Network Policies feature. Moon already can assign custom labels to running browser pods. To apply a firewall rule to browser pods you need to assign a set of custom labels to these pods and then create a NetworkPolicy matching pods with podSelector using these labels. An example of how you can do this is shown here.
4.6. Connection was closed unexpectedly
If your HTTP requests are randomly hanging - this can mean that you can have too small HTTP request timeout value on your network load balancer (LoadBalancer, Ingress, Openshift Route). Very often default value is about 30 seconds and this can lead to closed connections when a lot of new Selenium session requests are being sent to Moon. How to set timeout setting usually depends on cloud platform you are using. For example when using AWS load balancer this can look like:
kind: Service
apiVersion: v1
metadata:
  name: moon
  namespace: moon
  annotations:
    service.beta.kubernetes.io/aws-load-balancer-connection-idle-timeout: "60" # AWS load balancer timeout setting
spec:
  type: LoadBalancer
  # The rest of spec goes here...
With Nginx Ingress this can be adjusted like this:
apiVersion: networking.k8s.io/v1
kind: Ingress
metadata:
  name: moon
  namespace: moon
  annotations:
    nginx.ingress.kubernetes.io/proxy-connect-timeout: "108000" # Note these timeout settings
    nginx.ingress.kubernetes.io/proxy-send-timeout: "108000"
    nginx.ingress.kubernetes.io/proxy-read-timeout: "108000"
spec:
  ingressClassName: nginx
  rules:
    # Rules come here...
4.7. DNS lookup timeouts
If you are using Flannel as Kubernetes networking engine and receiving DNS lookup timeouts like the following…
2019/02/21 08:37:32 [VNC_ERROR] [10.244.1.1] [dial tcp: lookup chrome-71-0-686efb96-eabe-4435-af31-21a33c8a4c8b on 10.96.0.10:53: read udp 10.244.1.11:40603->10.96.0.10:53: i/o timeout]…then you may need to set the following kernel property on Kubernetes nodes:
$ sysctl net.bridge.bridge-nf-call-iptables=14.8. Browser session timeouts do not work
This could because of incorrectly set -moon-url flag value. By default Moon is being exposed using Kubernetes service named moon and is available on port 4444. In that case everything works out of the box with default -moon-url flag value. In customized deployment your Moon service name can differ and you have to set -moon-url value flag explicitly. For example, having Moon being exposed with service named my-custom-moon-service on port 3333, you have to explicitly add flag -moon-url http://my-custom-moon-service:3333/wd/hub to your deployment manifests.
4.9. JSON processing errors in tests
In some environments your Selenium tests could from time to time start getting JSON processing errors like this:
Json exception: Expected to read a START_MAP but instead have: END. Last 0 characters readThe main reason of such behavior usually is incorrectly configured request proxy timeout on LoadBalancer or Ingress time. Very frequently default timeout value is 60 seconds and in cases when some Selenium operation takes more time, load balancer will abort request and send 502 error with no body or with HTML body. However Selenium clients always expect to have JSON in Selenium response body and anything else leads to JSON processing exceptions. To solve this - increase request timeout on load balancer side. How to do this should be described in load balancer documentation.
4.10. Is it possible to use Moon with private Docker registry?
Yes. How to do this is described here.
4.11. Is it possible to test HTTPS web applications with self-signed TLS certificates?
Yes, you can globally configure self-signed TLS root certification authorities. How to do this is shown here.
5. License Agreement
Last updated March 18th, 2022. Replaces the prior version in its entirety.
This is a legal agreement. By downloading, installing, copying, saving on Customer’s computer, or otherwise using Aerokube software, support or products Customer becomes a party to this Agreement and Customer consents to be bound by all the terms and conditions set forth below.
-
Parties
-
"Aerokube", "Licensor" or "We" means Aerokube Software OÜ, having its principal place of business at Harju maakond, Tallinn, Kesklinna linnaosa, Karu tn 14-8, 10120, Estonia, registered in the Commercial Register of Estonia, registry code: 14653208.
-
"Customer", "Licensee" or "You" means the sole proprietor or legal entity specified in the Subscription Confirmation. For legal entities, "Customer" includes any entity which controls, is controlled by, or is under common control with Customer. For the purposes of this definition, "control" means one of the following:
-
The power, directly or indirectly, to direct or manage such entity, whether by contract or otherwise.
-
Ownership of fifty percent (50%) or more of the outstanding shares or beneficial ownership of such entity.
-
-
-
Definitions
-
"Agreement" means this License Agreement.
-
"Product" means any generally available Licensor’s software product identified by Licensor as a software developer tool. For the avoidance of doubt, the Product is not produced to the specifications of Customer nor customized through modification or personalization, is intended for mass distribution, and no software code will be provided to Customer.
-
"User" means any employee, independent contractor or other personnel obtaining access to the Product(s) from Customer.
-
"Number of Concurrent Sessions" means maximum number of software testing processes being run using the Product in parallel. This can be for example browsers executing User’s tests.
-
"License Key" means a unique key-code that enables a Licensee to use the Product by unlocking the fixed Number of Concurrent Sessions. Only Licensor and/or its representatives are permitted to produce License Keys for the Product.
-
"Subscription" means an arrangement for making use of the Product of periodic nature on a prepayment plan. For the purpose of clarity, Subscription includes the subscription term, Products provided to Customer, subscription fees, payment schedules and fixed number of License Keys.
-
"Product Evaluation" means using the Product without a valid License Key.
-
"Subscription Confirmation" means an email confirming Customer’s rights to access and use Products, including total Number of Concurrent Sessions.
-
"Product Installation" means a Product copy running on Customer’s computer device, hardware server or virtual machine.
-
"Product Version" means a release, update, or upgrade of a particular Product that is not identified by Licensor as being made for the purpose of fixing software bugs.
-
"Bug Fix Update" for a particular Product Version means a software update or release that is specifically identified by Licensor as a bug fix for that Product Version.
-
"E-mail Support" means a form of customer support provided by the Licensor. At the time of writing, the corresponding e-mail address is support@aerokube.com; should the address be changed, the new address will be referred to on the Licensor’s web site.
-
"Instant Messaging Support" means a form of customer support provided by the Licensor. At the time of writing, the corresponding address to support channel is https://t.me/aerokube_moon; should the address be changed, the new address will be referred to on the Licensor’s web site.
-
"Affiliate" means any entity belonging to the same group as the Licensor.
-
-
How this Agreement Works
-
Entire Agreement. This Agreement, including the Third-Party Software license terms, constitutes the entire agreement between the parties concerning its subject matter and supersedes any prior agreements between Customer and Licensor regarding Customer’s use of any Products. No purchase order, other ordering document or any handwritten or typewritten text which purports to modify or supplement the printed text of this Agreement or any schedule will add to or vary the terms of this Agreement unless signed by both Customer and Licensor.
-
Reservation of Rights. Aerokube reserves the right at any time to cease the support of the Product and to alter prices, features, specifications, capabilities, functions, terms of use, release dates, general availability or other characteristics of the Product.
-
Changes to this Agreement. We may update or modify this Agreement from time to time, including any referenced policies and other documents. If a revision meaningfully reduces Customer’s rights, we will use reasonable efforts to notify Customer. If we modify this Agreement, the modified version of the Agreement will be effective from the start of the next Subscription term. In this case, if Customer objects to the updated Agreement terms, as Customer’s exclusive remedy, Customer may cancel the Subscription. Customer may be required to click through the updated Agreement to show its acceptance. For the avoidance of doubt, each Subscription Confirmation is subject to the version of the Agreement in effect on the Subscription Confirmation date.
-
Opportunity to Review. Customer hereby declares that Customer has had sufficient opportunity to review this Agreement, understand the content of all of its clauses, negotiate its terms, and seek independent professional legal advice in that respect before entering into it. Consequently, any statutory "form contract" ("adhesion contract") regulations shall not be applicable to this Agreement.
-
Severability. If a particular term of this Agreement is not enforceable, the unenforceability of that term will not affect any other terms of this Agreement.
-
Headings. Headings and titles are for convenience only and do not affect the interpretation of this Agreement.
-
No Waiver. Our failure to enforce or exercise any part of this Agreement is not a waiver of that section.
-
Notice. Aerokube may deliver any notice to Customer via electronic mail to an email address provided by Customer, registered mail, personal delivery or renowned express courier (such as DHL, FedEx or UPS). Any such notice will be deemed to be effective:
-
On the day the notice is sent to Customer via email.
-
Upon personal delivery.
-
One (1) day after deposit with an express courier or five (5) days after deposit in the mail, whichever occurs first.
-
-
Governing Law. This Agreement will be governed by the laws of the Estonia, without reference to conflict of laws principles. Customer agrees that any litigation relating to this Agreement may only be brought in, and will be subject to the jurisdiction of, any competent court of the Estonia. The parties agree that the United Nations Convention on Contracts for the International Sale of Goods does not apply to this Agreement.
-
Exceptions or Modifications. For exceptions or modifications to this Agreement, please contact Aerokube at: support@aerokube.com In case the terms of this Agreement are in conflict with the terms of any agreement individually negotiated and agreed between Aerokube and Customer, the terms of the latter shall prevail.
-
Force Majeure. Except with respect to Customer’s payment obligations, neither party shall be liable to the other for any delay or failure to perform any obligation under this Agreement (except for a failure to pay fees) if the delay or failure is due to unforeseen events which occur after the signing of this Agreement and which are beyond the reasonable control of such party ("Force Majeure Event"), such as a strike, blockade, war, act of terrorism, riot, natural disaster, failure or diminishment of power or telecommunications or data networks or services, or refusal of a license by a government agency. In the event of a Force Majeure Event that prevents one part from substantially performing its obligations hereunder for a period of ten (10) days or more, either party may terminate this Agreement on five (5) days written notice.
-
-
Grant of Rights
-
The Product include code and libraries licensed to Licensor by third parties, including open source software.
-
The Product is provided basing on the Number of Concurrent Sessions. If Customer complies with the terms of this Agreement, Customer has the rights stipulated hereunder for each Subscription that Customer acquires. Customer’s rights acquired in relation to the Product are limited to those necessary to enable Customer and its Users to effectively operate the Product(s). All other rights remain reserved to Licensor.
-
Unless the Subscription has expired or this Agreement is terminated in accordance with respective section, and subject to the terms and conditions specified herein, Licensor grants Customer a non-exclusive and non-transferable right to use each Product covered by the Subscription as stipulated below.
-
Customer may:
-
For each License Key included to Subscription have one Product Installation of any version covered by the Subscription on any operating system supported by the Product.
-
Do Product Evaluation on one Product Installation of any version on any operating system supported by the Product.
-
Make one backup copy of the Product solely for archival/security backup purposes.
-
-
Customer may not:
-
Allow the same Product Installation to be used concurrently by more than the Number of Concurrent Sessions specified for used License Key in Subscription Confirmation.
-
Rent, lease, reproduce, modify, adapt, create derivative works of, distribute, sell, or transfer the Product.
-
Provide access to the Product or the right to use the Product to a third party.
-
Reverse engineer, decompile, disassemble, modify, translate, make any attempt to discover the source code of the Product.
-
Remove or obscure any proprietary or other notices contained in the Product.
-
-
Customer acknowledges that no ownership right is conveyed to Customer under this Agreement, irrespective of the use of terms such as "purchase" or "sale". Licensor has and retains all rights, title and interest, including all intellectual property rights, in and to the Products and any and all related or underlying technology, and any modifications or derivative works thereof, including without limitation as they may incorporate Feedback (as defined below).
-
This Agreement applies whether Customer purchases a Subscription directly from Licensor or through resellers. If Customer purchases through a reseller, the Subscription details shall be as stated in the Subscription Confirmation issued by the reseller to Customer, and the reseller is responsible for the accuracy of any such Subscription Confirmation. Resellers are not authorized to make any promises or commitments on Licensor behalf, and Customer understands and agrees that Licensor is not bound by any obligations to Customer other than as specified in this Agreement.
-
-
Access to Products
-
All deliveries under this Agreement will be electronic. Customer and its Users must have an Internet connection in order to receive any deliveries. For the avoidance of doubt, Customer is responsible for downloading and installing the Products. Download instructions are made available on Licensor website at https://aerokube.com/moon/.
-
Customer enables full access to Product Installation by specifying a License Key from Subscription Confirmation.
-
Subject to the terms of this Agreement, Customer is granted a right to install and use the Product for evaluation purposes without charge for unlimited amount of time. The Product contains a feature that will automatically limit allowed Number of Concurrent Sessions. Licensor reserves the right at any time to change that limit in new Product versions.
-
-
Fees
-
Customer shall pay its Subscription fees in accordance with Licensor Terms of Purchase or the reseller’s terms of purchase, whichever are applicable.
-
The Subscription fees shall be paid in full, and any levies, duties and/or taxes imposed by Customer’s jurisdiction (including, but not limited to, value added tax, sales tax and withholding tax), shall be borne solely by Customer.
-
Customer may not deduct any amounts from fees payable to Licensor or the reseller, unless otherwise specified in the applicable terms of purchase.
-
-
Feedback
-
Customer has no obligation to provide Licensor with ideas, suggestions, or proposals ("Feedback").
-
If Customer or Users submit Feedback to Licensor, then Customer grants Licensor a non-exclusive, worldwide, royalty-free license that is sub-licensable and transferable, to make, use, sell, have made, offer to sell, import, reproduce, publicly display, distribute, modify, or publicly perform the Feedback in any manner without any obligation, royalty or restriction based on intellectual property rights or otherwise.
-
-
LIMITED WARRANTY
ALL PRODUCTS ARE PROVIDED TO CUSTOMER ON AN "AS IS" AND "AS AVAILABLE" BASIS WITHOUT WARRANTIES. USE OF THE PRODUCTS IS AT YOUR OWN RISK. AEROKUBE MAKES NO WARRANTY AS TO THEIR USE OR PERFORMANCE. TO THE MAXIMUM EXTENT PERMITTED BY APPLICABLE LAW, AEROKUBE, AND ITS SUPPLIERS (WHICH SHALL INCLUDE THE PROVIDERS OF THE THIRD PARTY SOFTWARE) AND RESELLERS, DISCLAIM ALL WARRANTIES AND CONDITIONS, EITHER EXPRESS OR IMPLIED, INCLUDING, BUT NOT LIMITED TO, THE IMPLIED WARRANTIES OF MERCHANTABILITY, FITNESS FOR A PARTICULAR PURPOSE, TITLE, AND NON-INFRINGEMENT, WITH REGARD TO THE PRODUCTS, AND THE PROVISION OF OR FAILURE TO PROVIDE SUPPORT SERVICES. THIS LIMITED WARRANTY GIVES CUSTOMER SPECIFIC LEGAL RIGHTS. CUSTOMER MAY HAVE OTHER RIGHTS, WHICH VARY FROM STATE/JURISDICTION TO STATE/JURISDICTION. AEROKUBE (AND ITS AFFILIATES, AGENTS, DIRECTORS AND EMPLOYEES) DOES NOT WARRANT:
-
THAT THE PRODUCTS ARE ACCURATE, RELIABLE OR CORRECT
-
THAT THE PRODUCTS WILL MEET YOUR REQUIREMENTS
-
THAT THE PRODUCTS WILL BE AVAILABLE AT ANY PARTICULAR TIME OR LOCATION, UNINTERRUPTED OR SECURE
-
THAT ANY DEFECTS OR ERRORS WILL BE CORRECTED
-
THAT THE PRODUCTS ARE FREE OF VIRUSES OR OTHER HARMFUL COMPONENTS
ANY CONTENT OR DATA DOWNLOADED OR OTHERWISE OBTAINED THROUGH THE USE OF THE PRODUCTS ARE DOWNLOADED AT YOUR OWN RISK AND YOU WILL BE SOLELY RESPONSIBLE FOR ANY DAMAGE TO YOUR PROPERTY OR LOSS OF DATA THAT RESULTS FROM SUCH DOWNLOAD. NO WARRANTY OR LIABILITY AT ALL IS GIVEN TO PRODUCTS UNDER EVALUATION.
-
-
DISCLAIMER OF DAMAGES
-
TO THE MAXIMUM EXTENT PERMITTED BY APPLICABLE LAW, IN NO EVENT WILL AEROKUBE (OR ITS AFFILIATES, AGENTS, DIRECTORS, OR EMPLOYEES), OR AEROKUBE LICENSORS, SUPPLIERS OR RESELLERS BE LIABLE TO CUSTOMER OR ANYONE ELSE FOR:
-
ANY LOSS OF USE, DATA, GOODWILL, OR PROFITS, WHETHER OR NOT FORESEEABLE
-
ANY LOSS OR DAMAGES IN CONNECTION WITH TERMINATION OR SUSPENSION OF CUSTOMER’S ACCESS TO OUR PRODUCTS IN ACCORDANCE WITH THIS AGREEMENT
-
ANY SPECIAL, INCIDENTAL, INDIRECT, CONSEQUENTIAL, EXEMPLARY OR PUNITIVE DAMAGES WHATSOEVER (EVEN IF WE HAVE BEEN ADVISED OF THE POSSIBILITY OF THESE DAMAGES), INCLUDING THOSE:
-
RESULTING FROM LOSS OF USE, DATA, OR PROFITS, WHETHER OR NOT FORESEEABLE
-
BASED ON ANY THEORY OF LIABILITY, INCLUDING BREACH OF CONTRACT OR WARRANTY, STRICT LIABILITY, NEGLIGENCE OR OTHER TORTIOUS ACTION
-
ARISING FROM ANY OTHER CLAIM ARISING OUT OF OR IN CONNECTION WITH CUSTOMER’S USE OF OR ACCESS TO THE PRODUCTS OR SUPPORT.
-
-
-
THE FOREGOING LIMITATION OF LIABILITY SHALL APPLY TO THE FULLEST EXTENT PERMITTED BY LAW IN THE APPLICABLE JURISDICTION.
-
THE TOTAL LIABILITY IN ANY MATTER ARISING OUT OF OR IN RELATION TO THIS AGREEMENT IS LIMITED TO ONE HUNDRED (100) US DOLLARS OR THE AGGREGATE AMOUNT PAID OR PAYABLE BY THE CUSTOMER FOR PRODUCTS DURING THE THREE-MONTH PERIOD PRECEDING THE EVENT GIVING RISE TO THE LIABILITY, WHICHEVER IS GREATER. THIS LIMITATION WILL APPLY EVEN IF WE OR YOU HAVE BEEN ADVISED OF THE POSSIBILITY OF LIABILITY EXCEEDING SUCH AMOUNT AND NOTWITHSTANDING ANY FAILURE OF THE ESSENTIAL PURPOSE OF ANY LIMITED REMEDY.
-
-
Term and Termination
-
The term of this Agreement will commence upon acceptance of this Agreement by Customer as set forth in the preamble above, and will continue for each Product through the end of the applicable subscription period specified in the respective Subscription Confirmation. This Agreement will automatically renew with respect to each Product for a successive subscription term, unless terminated as set forth herein.
-
Customer may terminate this Agreement at any time by cancelling its Product subscription. If such termination occurs during a then-current subscription period, this Agreement will continue to be effective until the end of that subscription period. Such termination does not relieve Customer of the obligation to pay any outstanding subscription fees owed to Licensor, and no credits or refunds will be issued to Customer for prepaid subscription fees (except as specified in the Licensor Terms of Purchase, if applicable).
-
Licensor may terminate this agreement if:
-
Customer has materially breached this Agreement and fails to cure such breach within thirty (30) days of written notice thereof.
-
Customer fails to make the timely payment of subscription fees in accordance with "Fees" Section of this Agreement.
-
Licensor is required to do so by law (for example, where the provision of the Product to Customer is, or becomes, unlawful).
-
Licensor elects to discontinue providing the Product, in whole or in part.
-
-
Licensor will make reasonable efforts to notify Customer via email as follows:
-
Thirty (30) days prior to termination of the Agreement when required to terminate by law or because of discontinued Product. In such events Customer will be entitled to a refund of the unused portion of prepaid subscription fees, if applicable.
-
Three (3) days prior to termination of the Agreement in other cases. In such events Customer will not be entitled to any refund of the unused portion of prepaid subscription fees.
-
-
-
Temporary Suspension for Non-payment
-
Licensor reserves the right to suspend or limit Customer’s access to Aerokube Products if Customer fails to pay subscription fees on time.
-
If Licensor suspends or limits Customer’s access to Aerokube Products for non-payment according, Customer must pay all past due amounts in order to restore full access to Aerokube Products.
-
Customer hereby agrees that Licensor is entitled to charge Customer for the time period during which Customer has access to Aerokube Products until Customer or Licensor terminates or suspends Customer’s subscription in accordance with this Agreement.
-
-
Export Regulations
Customer shall comply with all applicable laws and regulations with regards to economic sanctions, export controls, import regulations, and trade embargoes (all herein referred to as "Sanctions"), including those of the European Union and United States (specifically the Export Administration Regulations (EAR)). Customer declares that it is not a person targeted by Sanctions nor is it otherwise owned or controlled by or acting on behalf of any person targeted by Sanctions. Further, Customer warrants that it will not download or otherwise export or re-export the Product or any related technical data directly or indirectly to any person targeted by Sanctions or download or otherwise use the Product for any end-use prohibited or restricted by Sanctions.
-
Customer Support
-
Licensor provides Email Support as well as Instant Messaging Support. The response time will be reasonable, but no specific response time guarantees are given.
-
Customer may request additional paid support from Licensor which is subject of a supplementary individually negotiated Agreement between Customer and Licensor.
-
Any guarantees of support availability only apply to the latest version of Licensed Software available in Customer Subscription.
-
-
Customer Data
-
Use of Name and Logo. Customer agrees that Licensor may identify it as a customer of Aerokube and may refer to it by name, trade name and trademark, if applicable. Licensor may also briefly describe Customer’s business in Licensor marketing materials, on the Aerokube website and/or in public or legal documents. Customer hereby grants Licensor a worldwide, non-exclusive and royalty-free license to use Customer’s name and any of Customer’s trade names and trademarks solely pursuant to this marketing section. Notwithstanding anything to the contrary herein, Licensor acknowledges that in some cases Customer licenses and does not own marks or logos (for example, marks or logos of the Affiliates) and cannot permit Licensor to use such marks.
-
Gathering of Usage Statistics. Customer acknowledges and agrees that the Product may contain a feature that reports the usage statistics, diagnostics information and usage meta-information of the Product back to the Licensor. Customer may opt out of the gathering of usage statistics by turning off this feature in the Product settings.
-
6. Pricing
Last updated December 17th, 2021. Replaces the prior version in its entirety.
-
Moon price is calculated using so-called
Number of Concurrent Sessionsthat is to say total number of browser sessions being run in parallel. We control this by limiting total number of simultaneously running browser pods to the value you are purchasing. -
When no license key is provided
4 (four)parallel browser sessions maximum are allowed. If such limit is sufficient for you - you are allowed use Moon without license key for unlimited period of time. -
If free limit is insufficient - you need
a paid license. Such license can includeany desired numberof parallel browser sessions (yes, even42). -
Every parallel session has a fixed cost -
$5 USD(five United States dollars). If you are a EU-based company - then we convert the price to euro (€).An example price calculation42 sessions * $5/month = $210/month
-
For simplicity, we calculated monthly prices for some frequent cases:
Table 17. Moon License Pricing Number of Parallel Sessions Price per Month, USD 0-4
free
5
$25
10
$50
15
$75
20
$100
25
$125
30
$150
40
$200
50
$250
75
$375
100
$500
150
$750
200
$1000
250
$1250
500
$2500
750
$3750
1000
$5000
Appendix A: Supported Mobile Devices
deviceName capability |
Notes |
|---|---|
Apple iPhone 15 Pro Max |
|
Apple iPhone 15 Pro |
|
Apple iPhone 15 Plus |
|
Apple iPhone 15 |
|
Apple iPhone 14 Pro Max |
|
Apple iPhone 14 Pro |
|
Apple iPhone 14 Plus |
|
Apple iPhone 14 |
|
Apple iPhone SE 2022 |
|
Apple iPhone 13 Pro Max |
|
Apple iPhone 13 Pro |
|
Apple iPhone 13 |
|
Apple iPhone 13 Mini |
|
Apple iPhone 12 Pro Max |
|
Apple iPhone 12 Pro |
|
Apple iPhone 12 |
|
Apple iPhone 12 Mini |
|
Apple iPhone 11 Pro Max |
|
Apple iPhone 11 Pro |
|
Apple iPhone 11 |
|
Apple iPad Air |
|
Apple iPad 10.2 (2019) |
|
Apple iPhone Xs |
|
Apple iPhone Xs Max |
|
Apple iPhone XR |
|
Apple iPhone 5/SE |
|
Apple iPhone 6/7/8 |
|
Apple iPhone 6/7/8 Plus |
|
Apple iPhone X |
|
Apple iPad |
|
Apple iPad Pro |
|
Apple iPhone 8 Plus |
|
Apple iPhone 8 |
|
Apple iPhone 7 Plus |
|
Apple iPhone 7 |
|
Apple iPhone SE |
|
Apple iPad Mini 4 |
|
Apple iPad Pro (10.5) |
iPad Pro 10.5" |
Apple iPad Pro (12.9) |
iPad Pro 12.9" |
Apple iPad Mini |
|
Apple iPhone 4 |
|
Blackberry PlayBook |
|
BlackBerry Z30 |
|
Google Nexus 4 |
|
Google Nexus 5 |
|
Google Nexus 5X |
|
Google Nexus 6 |
|
Google Nexus 6P |
|
Google Nexus 7 |
|
Google Nexus 10 |
|
Google Pixel 2 |
|
Google Pixel 2 XL |
|
Google Pixel 3 |
|
Google Pixel 3 XL |
|
Google Pixel 4 |
|
Google Pixel 4 XL |
|
Google Pixel 5 |
|
Nest Hub Max |
|
Nest Hub |
|
JioPhone 2 |
|
Kindle Fire HDX |
|
Laptop with touch |
|
Laptop with HiDPI screen |
|
Laptop with MDPI screen |
|
LG Optimus L70 |
|
Microsoft Lumia 550 |
|
Microsoft Lumia 950 |
|
Microsoft Surface Pro 7 |
|
Microsoft Surface Duo |
|
Motorola G4 |
|
Nokia Lumia 520 |
|
Nokia N9 |
|
Palm PVG100 |
|
Red Hydrogen One |
|
Samsung Galaxy S20 Ultra |
|
Samsung Galaxy A51/71 |
|
Samsung Galaxy A20 |
|
Samsung Galaxy Fold |
|
Samsung Galaxy Note 2 |
|
Samsung Galaxy Note 3 |
|
Samsung Galaxy Note 8 |
|
Samsung Galaxy Note 9 |
|
Samsung Galaxy Note 10 |
|
Samsung Galaxy Note 10+ |
|
Samsung Galaxy S3 |
|
Samsung Galaxy S5 |
|
Samsung Galaxy S7 |
|
Samsung Galaxy S8 |
|
Samsung Galaxy S8+ |
|
Samsung Galaxy S9 |
|
Samsung Galaxy S9+ |
|
Samsung Galaxy S10 |
|
Samsung Galaxy S10+ |
|
Samsung Galaxy S10e |
|
Samsung Galaxy Tab S3 |
|
Samsung Galaxy Tab S4 |